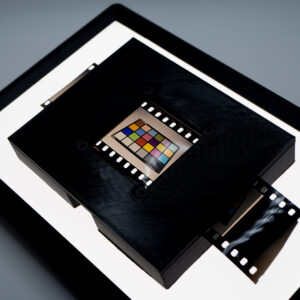
It took longer than it should have, but I finally listened to your pleas and have made a 35mm Full-Rebate (Full-Frame) Scanning Table! Available now right here on our direct store with eBay and Etsy to follow shortly. It is also available with the Raleno Scanning Table system by request and will be a normal offering at some point soon.
Honestly this wasn’t all that hard of a change to make. I had to move some of the hidden magnets around…and that was honestly about it apart from the gate sizing which I was able to take from my darkroom carrier designs. I’ve been wary of releasing a full-rebate option just for fear of film flatness. Since I don’t (yet!) have an ANR glass solution, the film flatness is impacted though it the same trade-off as in my darkroom carriers and I have found it is generally pretty minor. The flare is still certainly a factor but again like the darkroom carriers, if using good coated glass, it’s also pretty minor.
So I finally relented and am making this available! Some 120 sizes may follow for the 6×7, 6×12, and Raleno scanning tables as I am able. If folks have an interest in a 120 option, feel free to reach out!
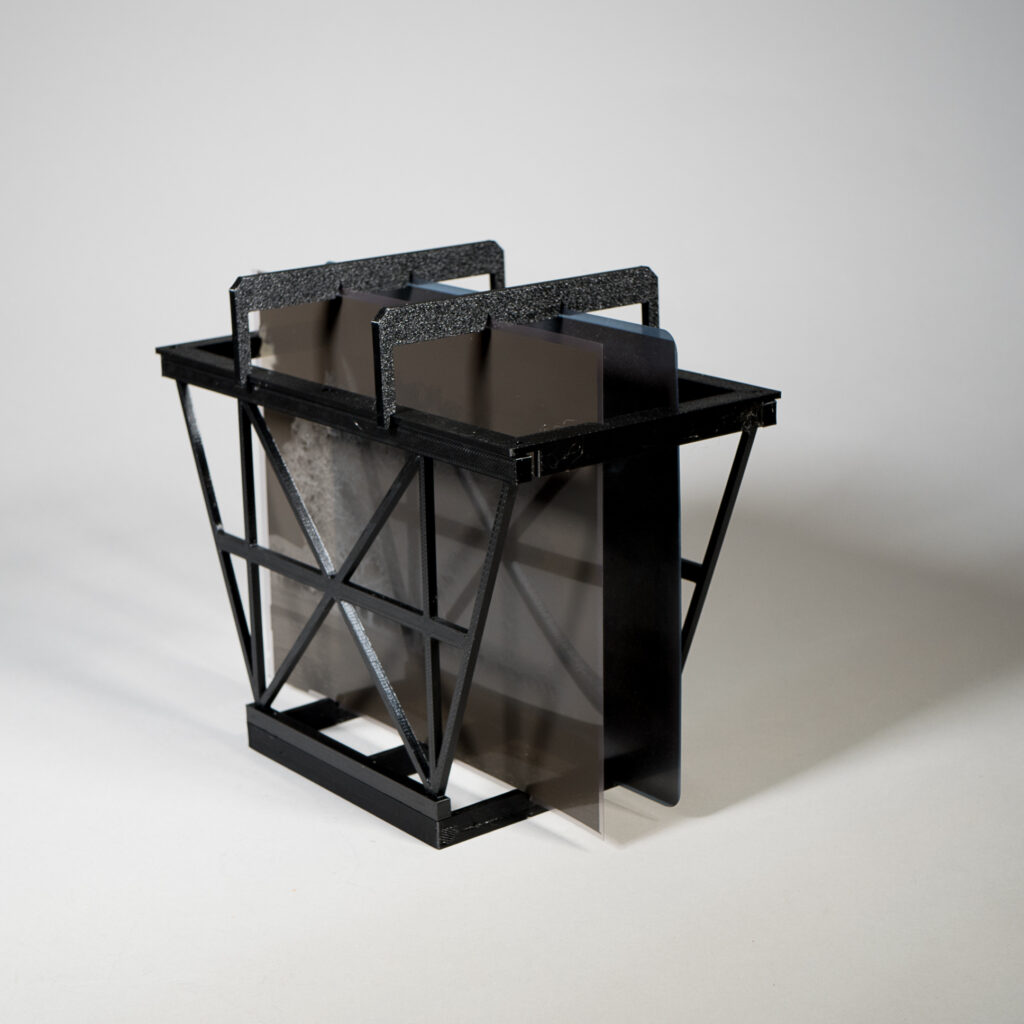
As long last I am finally confident enough in my 8×10 drying rack design to offer it up as a product!
It is a beta product for now just because I have only been able to test a few 8×10 films, though I suspect many will work. Any standard base film cut to proper dimensions should work (though if folks find otherwise do let me know). Thin base films (like those from Astrum/Svema) will not work at present as the base is too think to support itself.
Otherwise it works similarly to the 5×7 drying rack, just bigger. This includes hold downs. These are optional but recommended as they help keep the film straight and well separated from each other.
Currently only available in the 2 sheet variant, though I do plan on having perhaps up to 6 sheet options available.
If you have any questions about the drying rack, or really anything else, feel free to use our contact us form and reach out! Otherwise if you’d like to grab up an 8×10 rack they are available now!
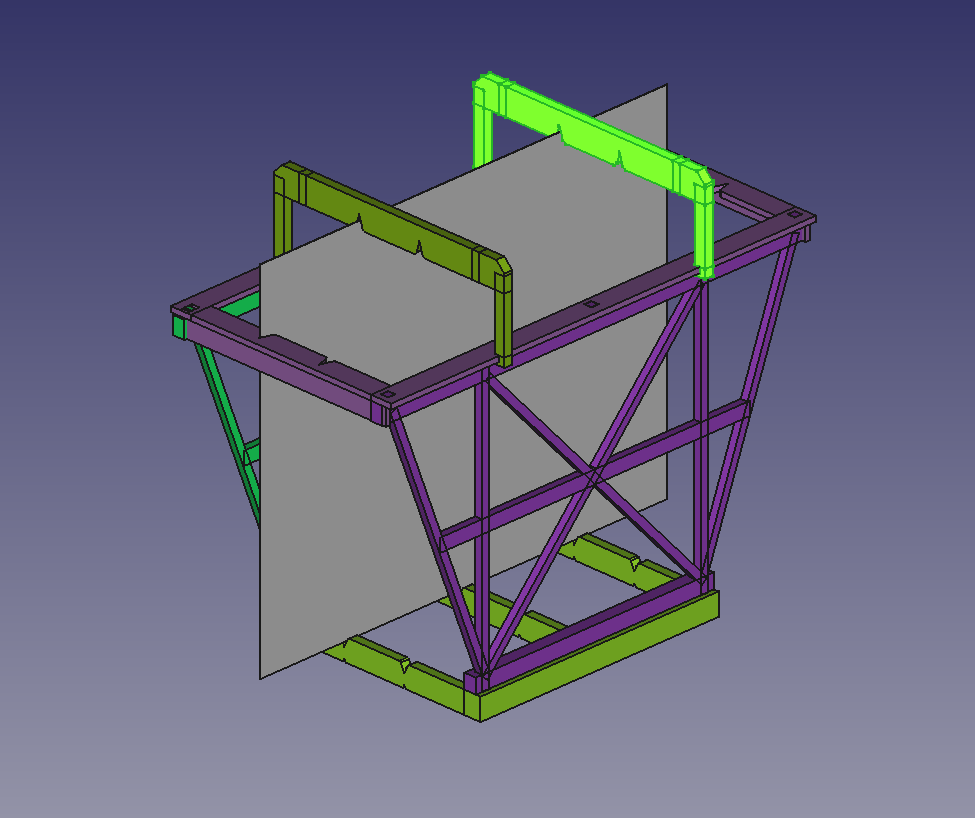
This might be the one, though I think I said that last time… I’ve been wanting to work on this for a while but between travel, getting orders out the door, and the incredible heat here, I haven’t been shooting much 8×10 and that’s put this a bit on the back burner. The last prototype worked well, but I did feel the sheets were just slightly too close together and, much like my 5×7 drying rack, would benefit from the optional hold-downs. The new design implements both of these changes. This would be a 2-sheet version and while I likely will offer a 2-sheet version, is mostly for economy while I’m prototyping designs. I expect to have at least a 4-sheet (and probably a 6-sheet) as a final product option. I’m hoping to test this soonish and finally have this as an official product not too long after!
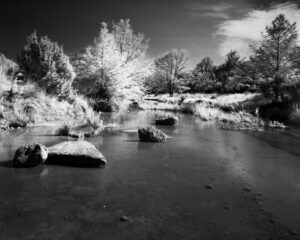
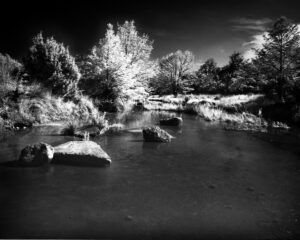
As I’ve been slowly getting into 8×10 large format photography, I’ve been wanting an 8×10 infrared film stock since I really enjoy taking IR photos using Rollei IR 400 in 4×5 (even with some of the annoying caveats). Until recently, I didn’t think there was an available solution (apart from super expired and expensive film), and while there’s varying opinions about whether FN64 is still being manufactured, it is available “new” from Astrum (a Ukranian based photographic company, of note). I managed to get my hands on some to test by way of a group buy and thought I would provide my initial findings:
Svema FN64
Rollei IR 400
These were taken minutes apart using an R72 filter and metered the same way. I bracketed 5 and 6 stops so for FN64, I rated it at an effective ISO of 1 and 2; and for Rollei IR 6 and 12. Oddly the Rollei came out a but underexposed and I also under-developed it slightly. That may explain why it seems to have a more dramatic appearance. Both were developed in Adox XT-3 (Replenished) in my DIY rotary. I picked the 1 ISO shot for FN64 and the ISO 6 for Rollei IR (more on that in a bit).
These images have been “dodged and burned” in Lightroom but with similar treatments to both. I wanted to compare results of how I would make an actual darkroom print rather than just a raw scan, although the raw scans aren’t too far off – I just accentuated the darkened sky a bit more and burned in the water some.
These were both shot in 4×5 – I only have 25 sheets of FN64 in 8×10 and didn’t want to break those out until I have a good working process in 4×5. FN64, like Rollei IR, is on a thin base. This is true for 35mm as well and, though I haven’t opened the 8×10 package yet, I expect it to be on a similarly thin base. That makes for a potentially challenging situation but one I hope I can work with. Being able to make contact prints for an 8×10 IR negative would be quite something!
The results are pretty close I would say. Of course, FN64 has lower grain and, being a much slower shutter speed (I believe 2 seconds), has more movement in the tree leaves though I quite like that. Unfortunately both sheets have some annoying blemishes. The FN64 has what looks like streaks running left to right which can be seen in the sky. I’m not sure if they would print through in the darkroom but they are definitely there in the scan. The Rollei IR has lots of pinholes (also in the sky). Oddly more than I usually get. Similarly, the other sheets from both films had one half of the image slightly darker divided right along the middle. I think this may be an issue in the camera (my Chamonix bellows aren’t fully IR safe and perhaps that’s enough to cause an issue, or there’s an issue with my holders – though I used two different brands for these tests).
I used a pre-wet for both films which I commonly do when using XT-3 in replenishment. For Rollei IR I tend to prefer 510-Pyro and expect that will be a good match for FN64. I started with XT-3 since it’s more economical to do film tests with. That and my last bottle of 510-Pyro seems to have crystalized in a weird way and opted not to risk it for these tests. My plan is to use the DeFehr semi-stand agitation method for both (probably in my SP-8×10 tank) and compare those results. The minimal agitation, I hope, will help avoid the pinholes for Rollei IR (it has helped in the past) and might perhaps avoid those developing streaks.
Thing about IR is there’s more of a guessing game going on since you can’t directly meter for the IR anyway which makes semi-stand development a reasonable trade-off I think. I don’t expect perfectly printable negatives necessarily. In the past using 510-Pyro with Rollei IR has made for some fairly easy to print negatives though and I hope FN64 will prove to be the same. If so, it might just be the solution I’ve been looking for in 8×10!
That is until Ilford finally decides to offer SFX 200 in sheets…. (that’ll be the day!)
Occasionally I’ve had customers ask what my 3D printing setup looks like. Until recently it was not something that was worthy of a photo, looking very much like a business that really hit its stride in 2020 😛 As we’ve grown, I recently had some extra funds and time to improve it to something that, while still modest, is something I don’t feel so embarrassed to share.
This is where most of the print magic happens! Just off the frame is a Corsi-Rosenthal box (a fancy way of saying a box fan with filters) to help pull out particulates. Out of frame on the left there is an AirGradient with a VOC sensor to detect presence of volatile organic compounds (VOCs). This is mostly for when printing ABS, which the printer on the bottom corner, a Voron V0.1, mostly does (it’s what prints the smaller tin-type stands, the lens hoods, and the 120 film canisters, spare printer parts).
The big honking printer left-center is my Voron 2.4. It’s for 8×10 Simpleasels and my Eurorack stuff (that’s over at bitbybitsynths.com). Next to it are my 3 beloved Prusa MK3 workhorses. The first two print most things. The last one mostly does my PETG prints (drying racks, lens discs, filter trays, blank Eurorack panels).
Most of the time I have anywhere between 3-5 printers running. I’m getting to the point where I could use a 6th. The next printer I plan to add is a Prusa XL so I have 2 printers that can make big things. After that, I might be pushing against power limits but there is some space in the other corner out of frame for another printer (perhaps an MK4, or a 300 Trident) as well as another small one on that desk with the V0 (perhaps another V0 or T0). I can also likely cram more MKs sized printers in once I get the dry boxes up on a shelf or hutch, depending on how much space the XL may end up taking.
Modest by full time print shop standards but for folks that were curious where their products are made, it’s in this room. Unless I’m laser cutting something. That’s in the garage and a story for another day…
Testing out my 8×10 drying rack prototype with some actual film!
This is Fomapan 200 (developed in 510-Pyro for the curious) and as you can see, it’s fairly bendy. I was already thinking I’ll need to add something along the top just like I have for the 5×7 drying racks to hold the film along the top-center. I also need to space the notches out further I think but it is coming along and I do expect I will be releasing it as a product at some point, though it will probably take another couple of iterations through some designs before I get it good enough to sell. Worry not though it’s coming!
This might not be as big a deal for others but it’s sure a big deal for us! And by us I mean my better half and I as the business has now grown that there are now two of us running things. I never dreamed we would get to do these things! Thanks to all who have supported us along the way!
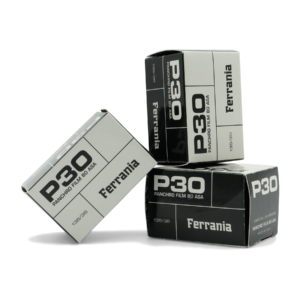
With that in mind, I’m incredibly excited to say we will soon be offering Film Ferrania ‘s P30 and Orto films! P30 will be coming shortly with Orto to follow soon!
Folks have probably seen some of my P30 tests. Those were already things I had planned on doing since I’ve had a handful of rolls here for a couple months now I’ve been meaning to use for doing some testing with 510-Pyro, XT-3 and maybe D23. I still plan on doing those and do plan on sharing those results here and on our website.
We’re definitely not the only place you can find Ferrania films (and that’s a good thing!) but if you’re already looking at picking up some of our negative carriers, scanning tables, drying racks, etc. you will soon be able to throw in a couple rolls of gorgeous Ferrania films!
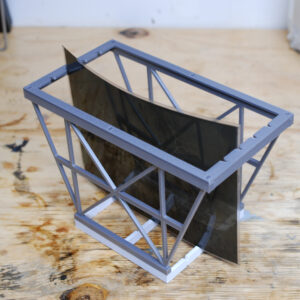
Recently I had a nice conversation with a very satisfied customer who purchased my 6×12 scanning table. They mentioned they were using it with the Raleno PLV-S116 video light. I knew of this before as it is an economical, and seemingly high CRI, light panel folks have been using for DSLR scanning already. The customer mentioned the scanning table fit almost perfectly on the light table.
I thought it might be worth checking out to compare to my Kaiser so I picked one up. Right off the bat, it’s MUCH brighter, has a matte surface (less chance of scratching), and has white balance control. Great! Only trouble was, it wouldn’t sit flat on a table with the offset knobs. So I thought, “why not build a holder for the Raleno and then make a scanning table fit on top of that?”
A day and a half later, here’s the first printed prototype!
Raleno stand with the 4×5 base and top, showing one of my Ektar negatives from our trip to Alaska last summer
First, yes, it’s pink. For prototypes I tend to use spare filament and happened to have a lot of shinky pink filament leftover from printing a bunch of Kirby figurines one day. At any rate, the point is the design works really well and a final version will, of course, be printed in opaque black. I’ve already designed a 35mm prototype which I plan on printing tomorrow with 120 to follow shortly after.
I’m not yet sure if this will be a full product yet but the answer is very probably! The Raleno does mean the whole setup is bigger than my 35mm scanning tables, which are meant to be small and compact. So it might not be for everyone but for those that want an fully enclosed solution, it could work really well I think!
If that’s something you’re interested in, certainly reach out! I might be looking for some beta testers!
A week or so ago, I announced BitChrome 100, which is Kodak 5294 (E100D) re-spooled into 100ft rolls suitable for use with still film bulk loaders. The main reason for doing this was so I could bulk load E100 film for doing product photography. Most of the time, I don’t need 36 exposures per roll and doing it this way allows me to only load what I need and minimize waste. Even bulk loaded, E100D isn’t cheap stuff!
While I also plan on sending film to a lab (such as The Slide Printer, who confirmed they will process bulk rolled film), I’ve also been testing out the Bellini E6 kit. I’m fond of this kit since it uses separate bleach and fix. My first go round wasn’t the best as I was pretty sure I missed the proper developing time for the 1st developer (arguably the most important) and under-developed the film. So this time I opted not to rotary process and, instead, used my steel 35mm tank, following the instructions more precisely and using a tempered bath that I was periodically refilling. I also left the film in the 1st developer for 7 minutes instead of 6. The Bellini kit recommends this for Fuji films but I had a hunch I should try it for E100 as well.
Turns out I think between that and my better processing, I ended up with much better results this time! I also improved my lighting setup substantially. I now have 2 LED light panels where I can set the white balance to 5600K (what E100 notes is daylight based on the datasheet). This also means I have much faster shutter speeds for doing actual product work, which is nice. I also now have a digital shutter release cable/trigger for my F100. I quite like the F100 but doing away with the mechanical release was a bummer.
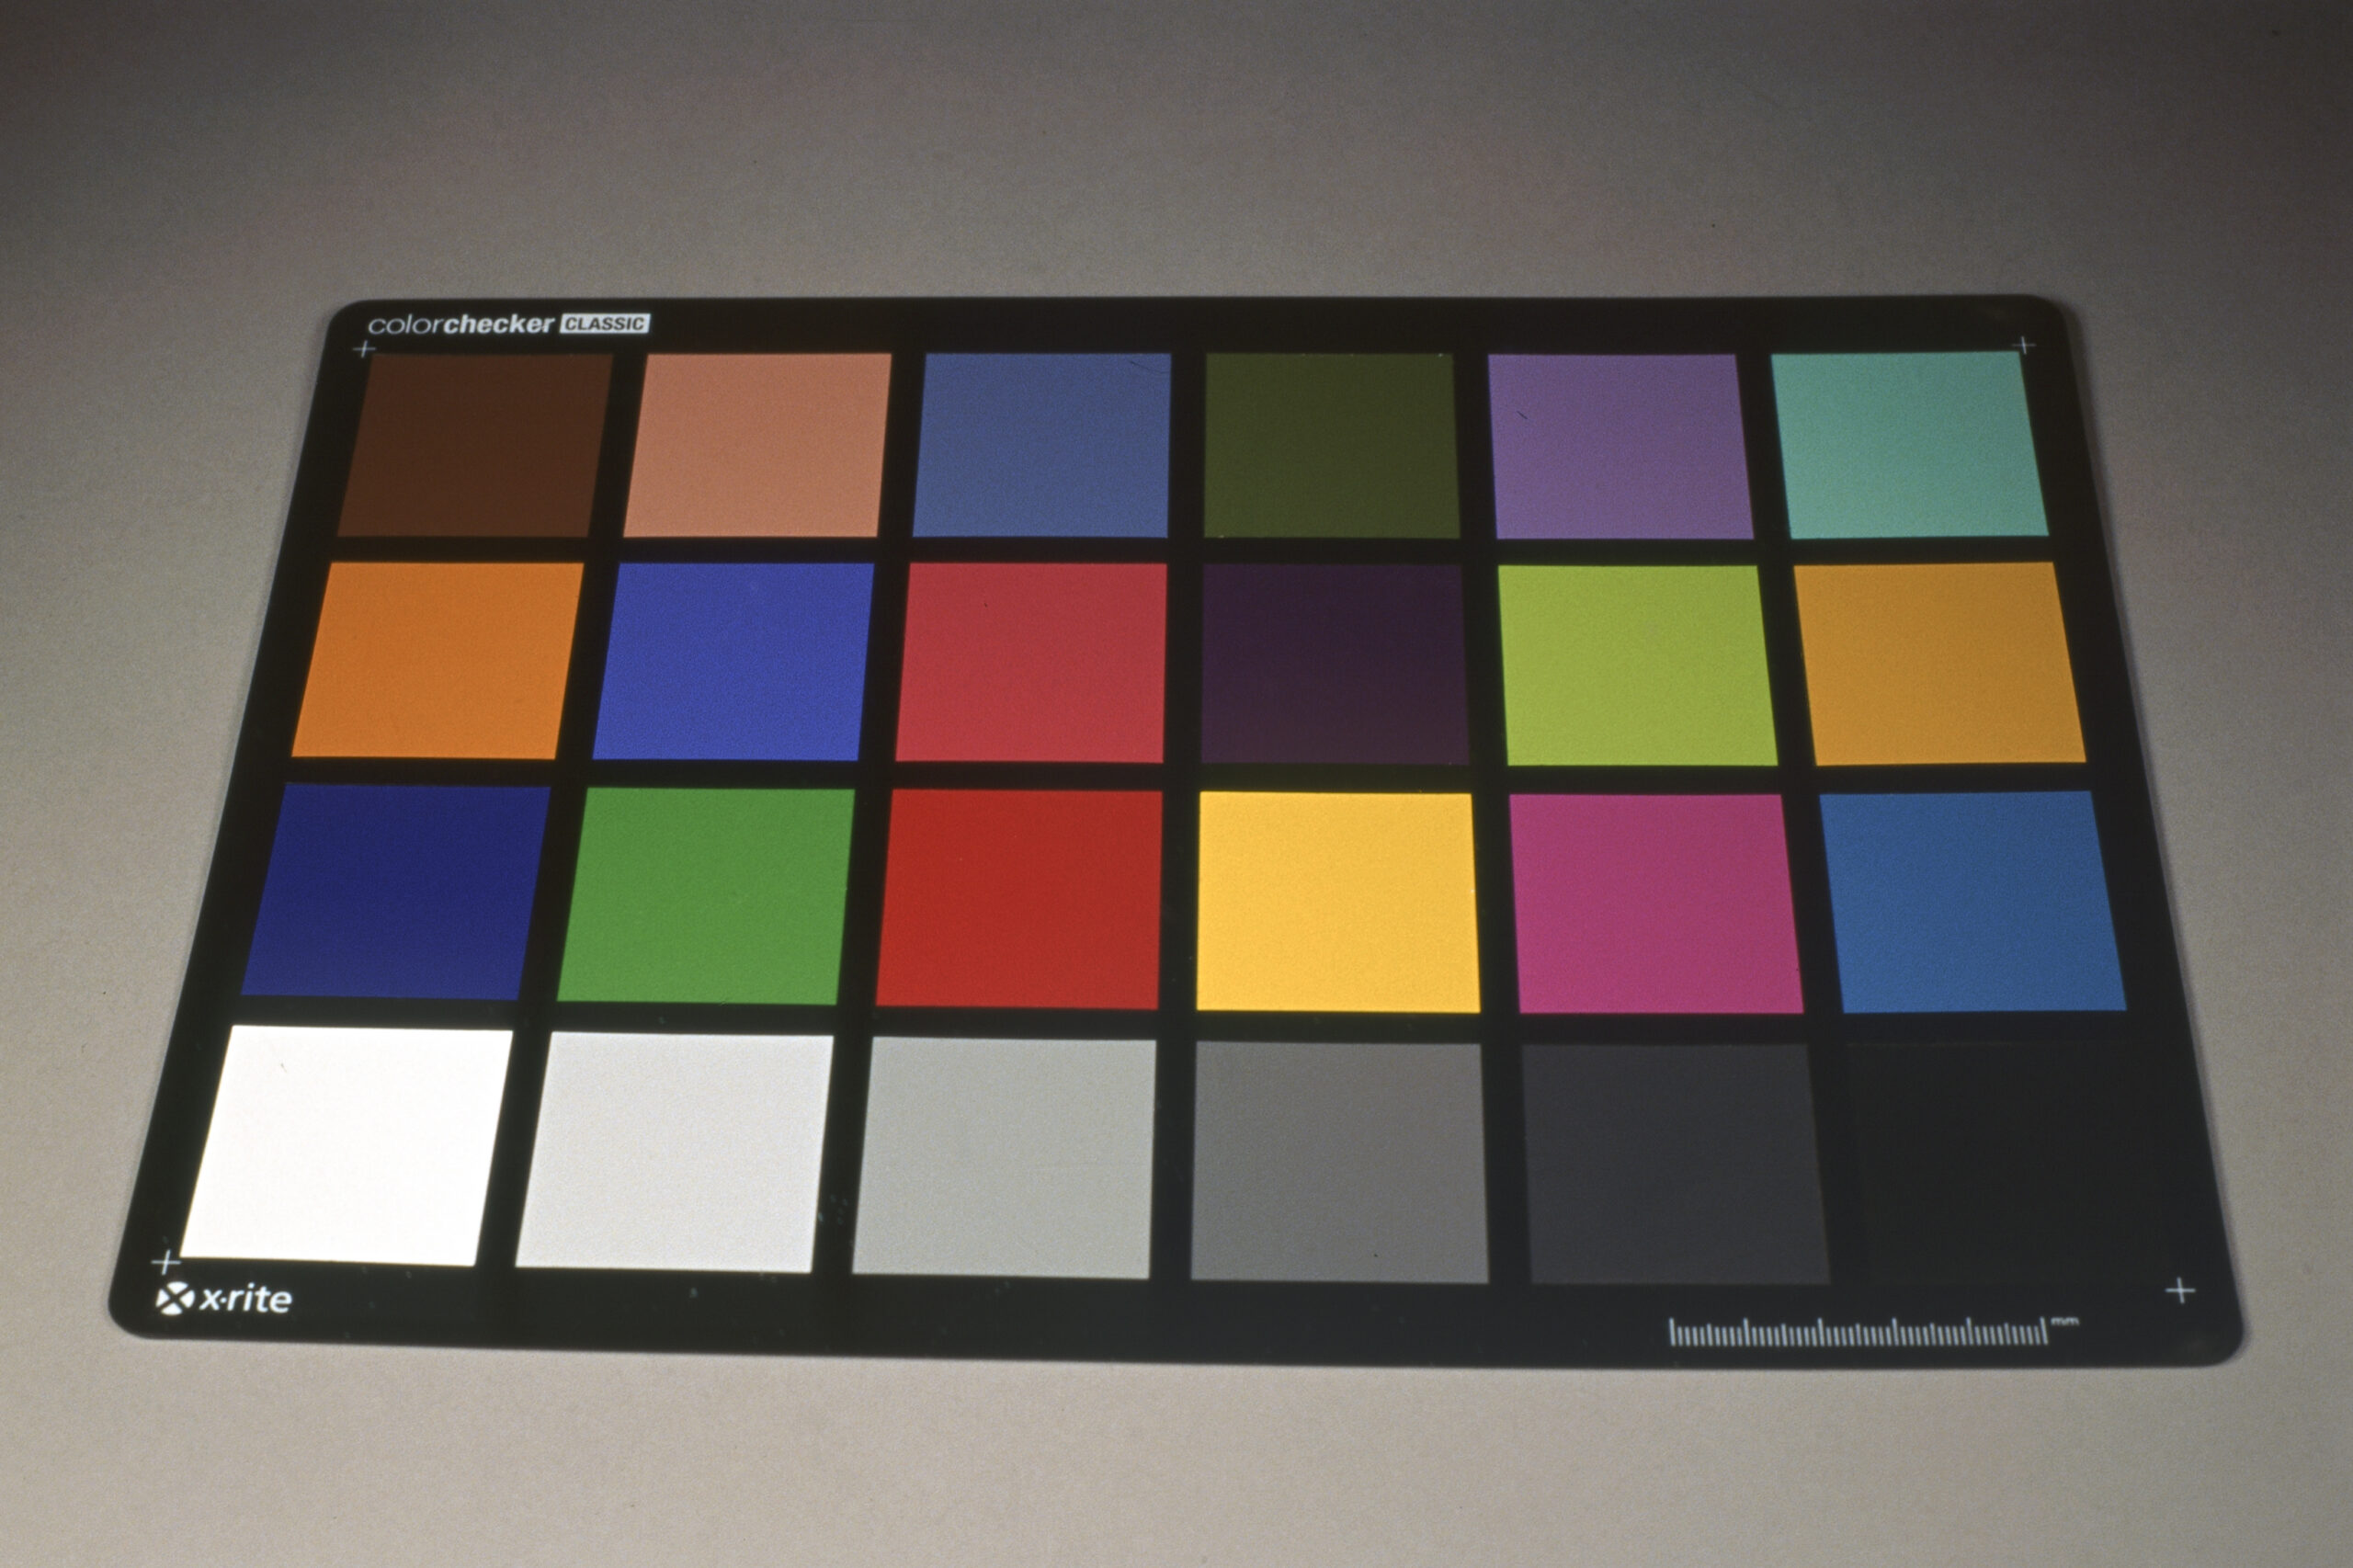
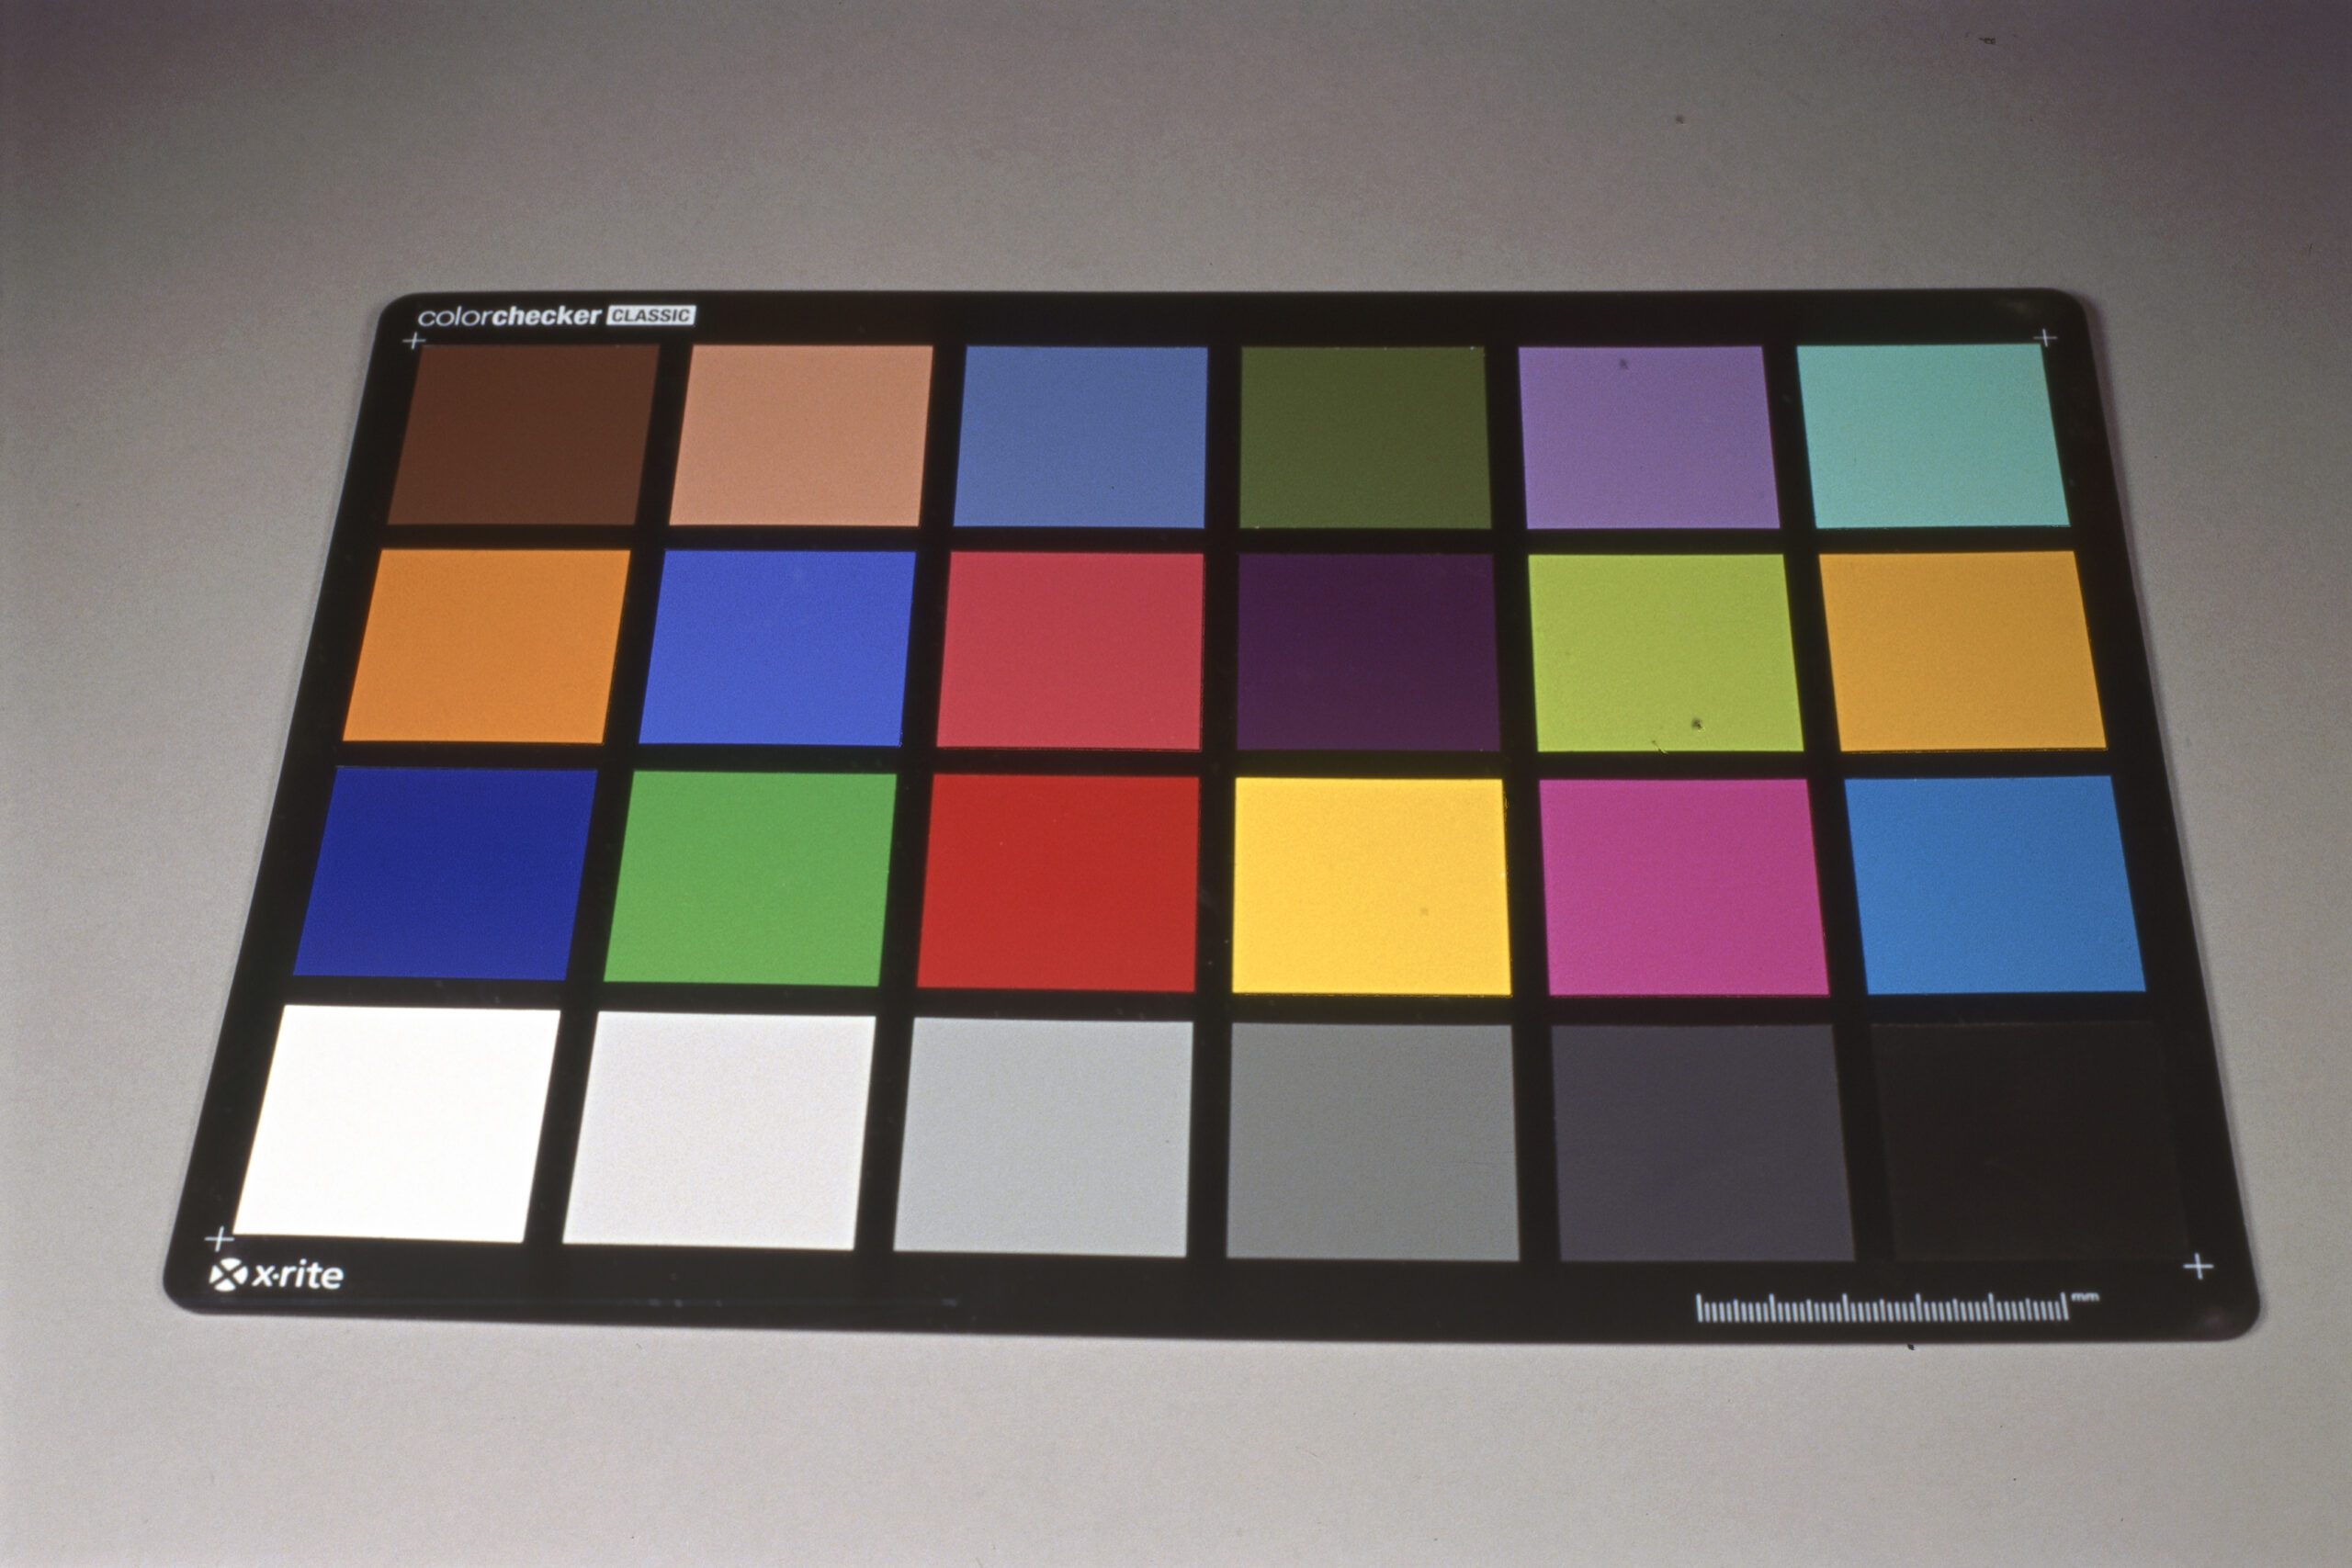
Anyways I decided I should do a bracket test:
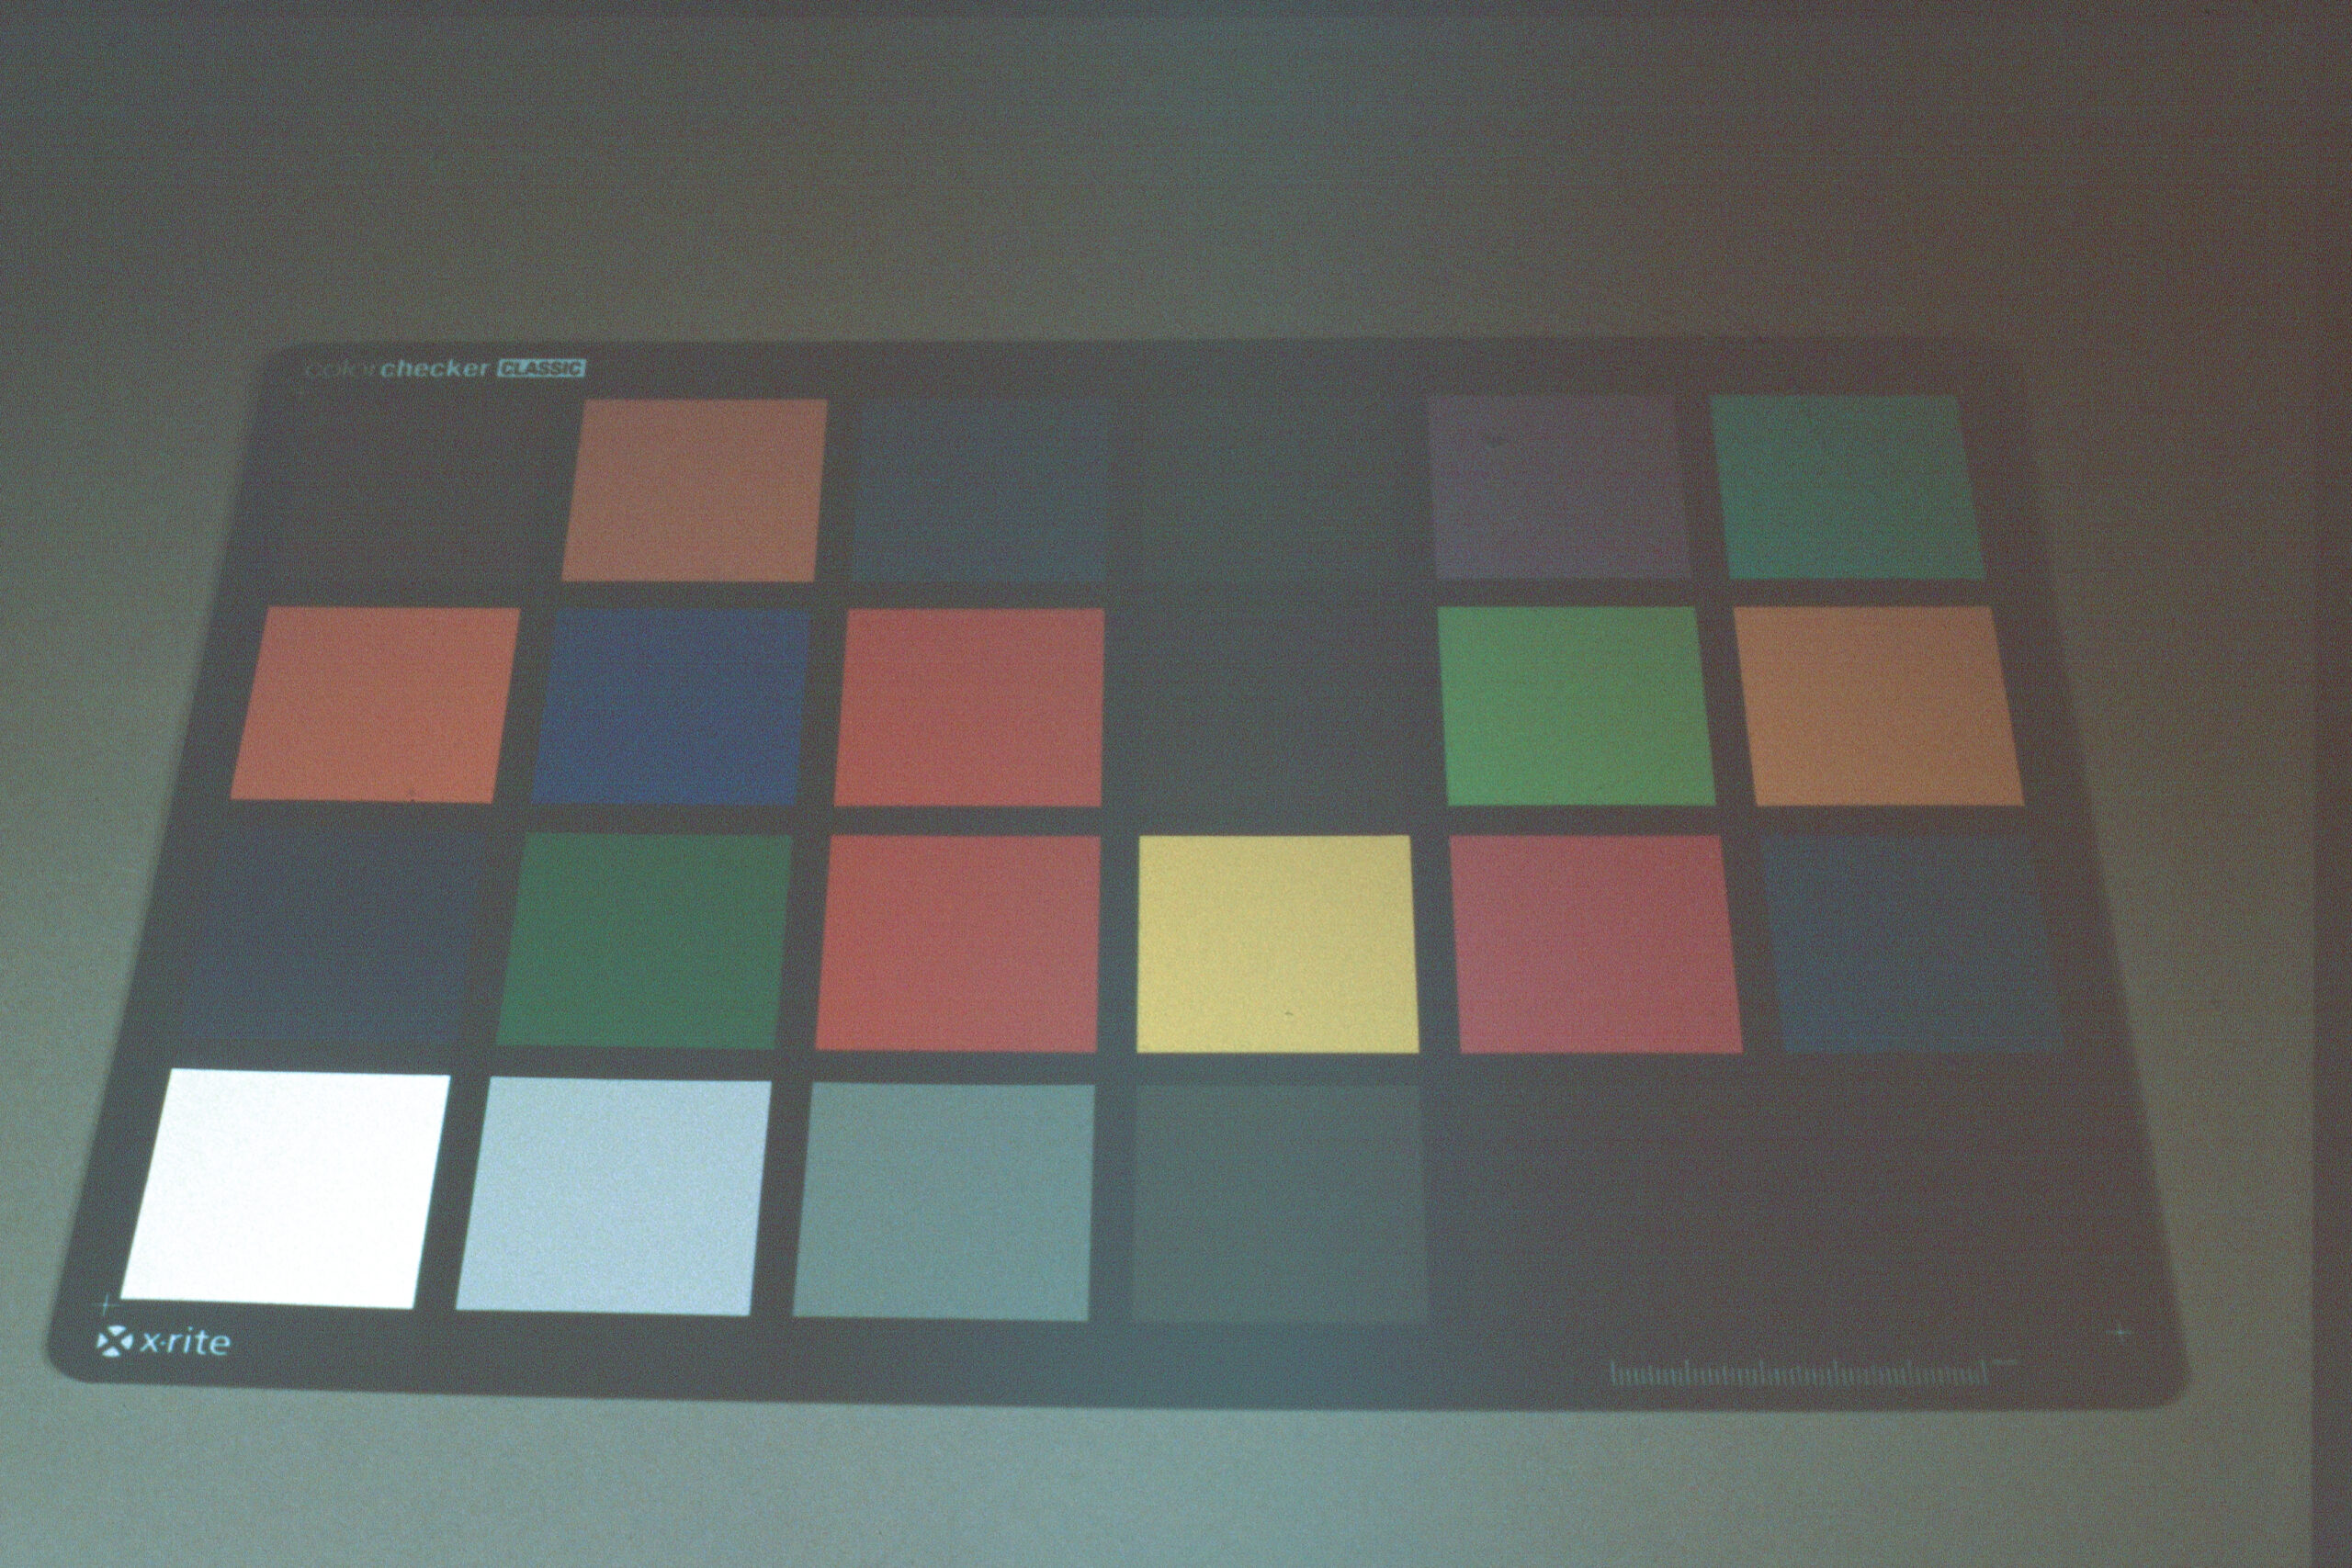
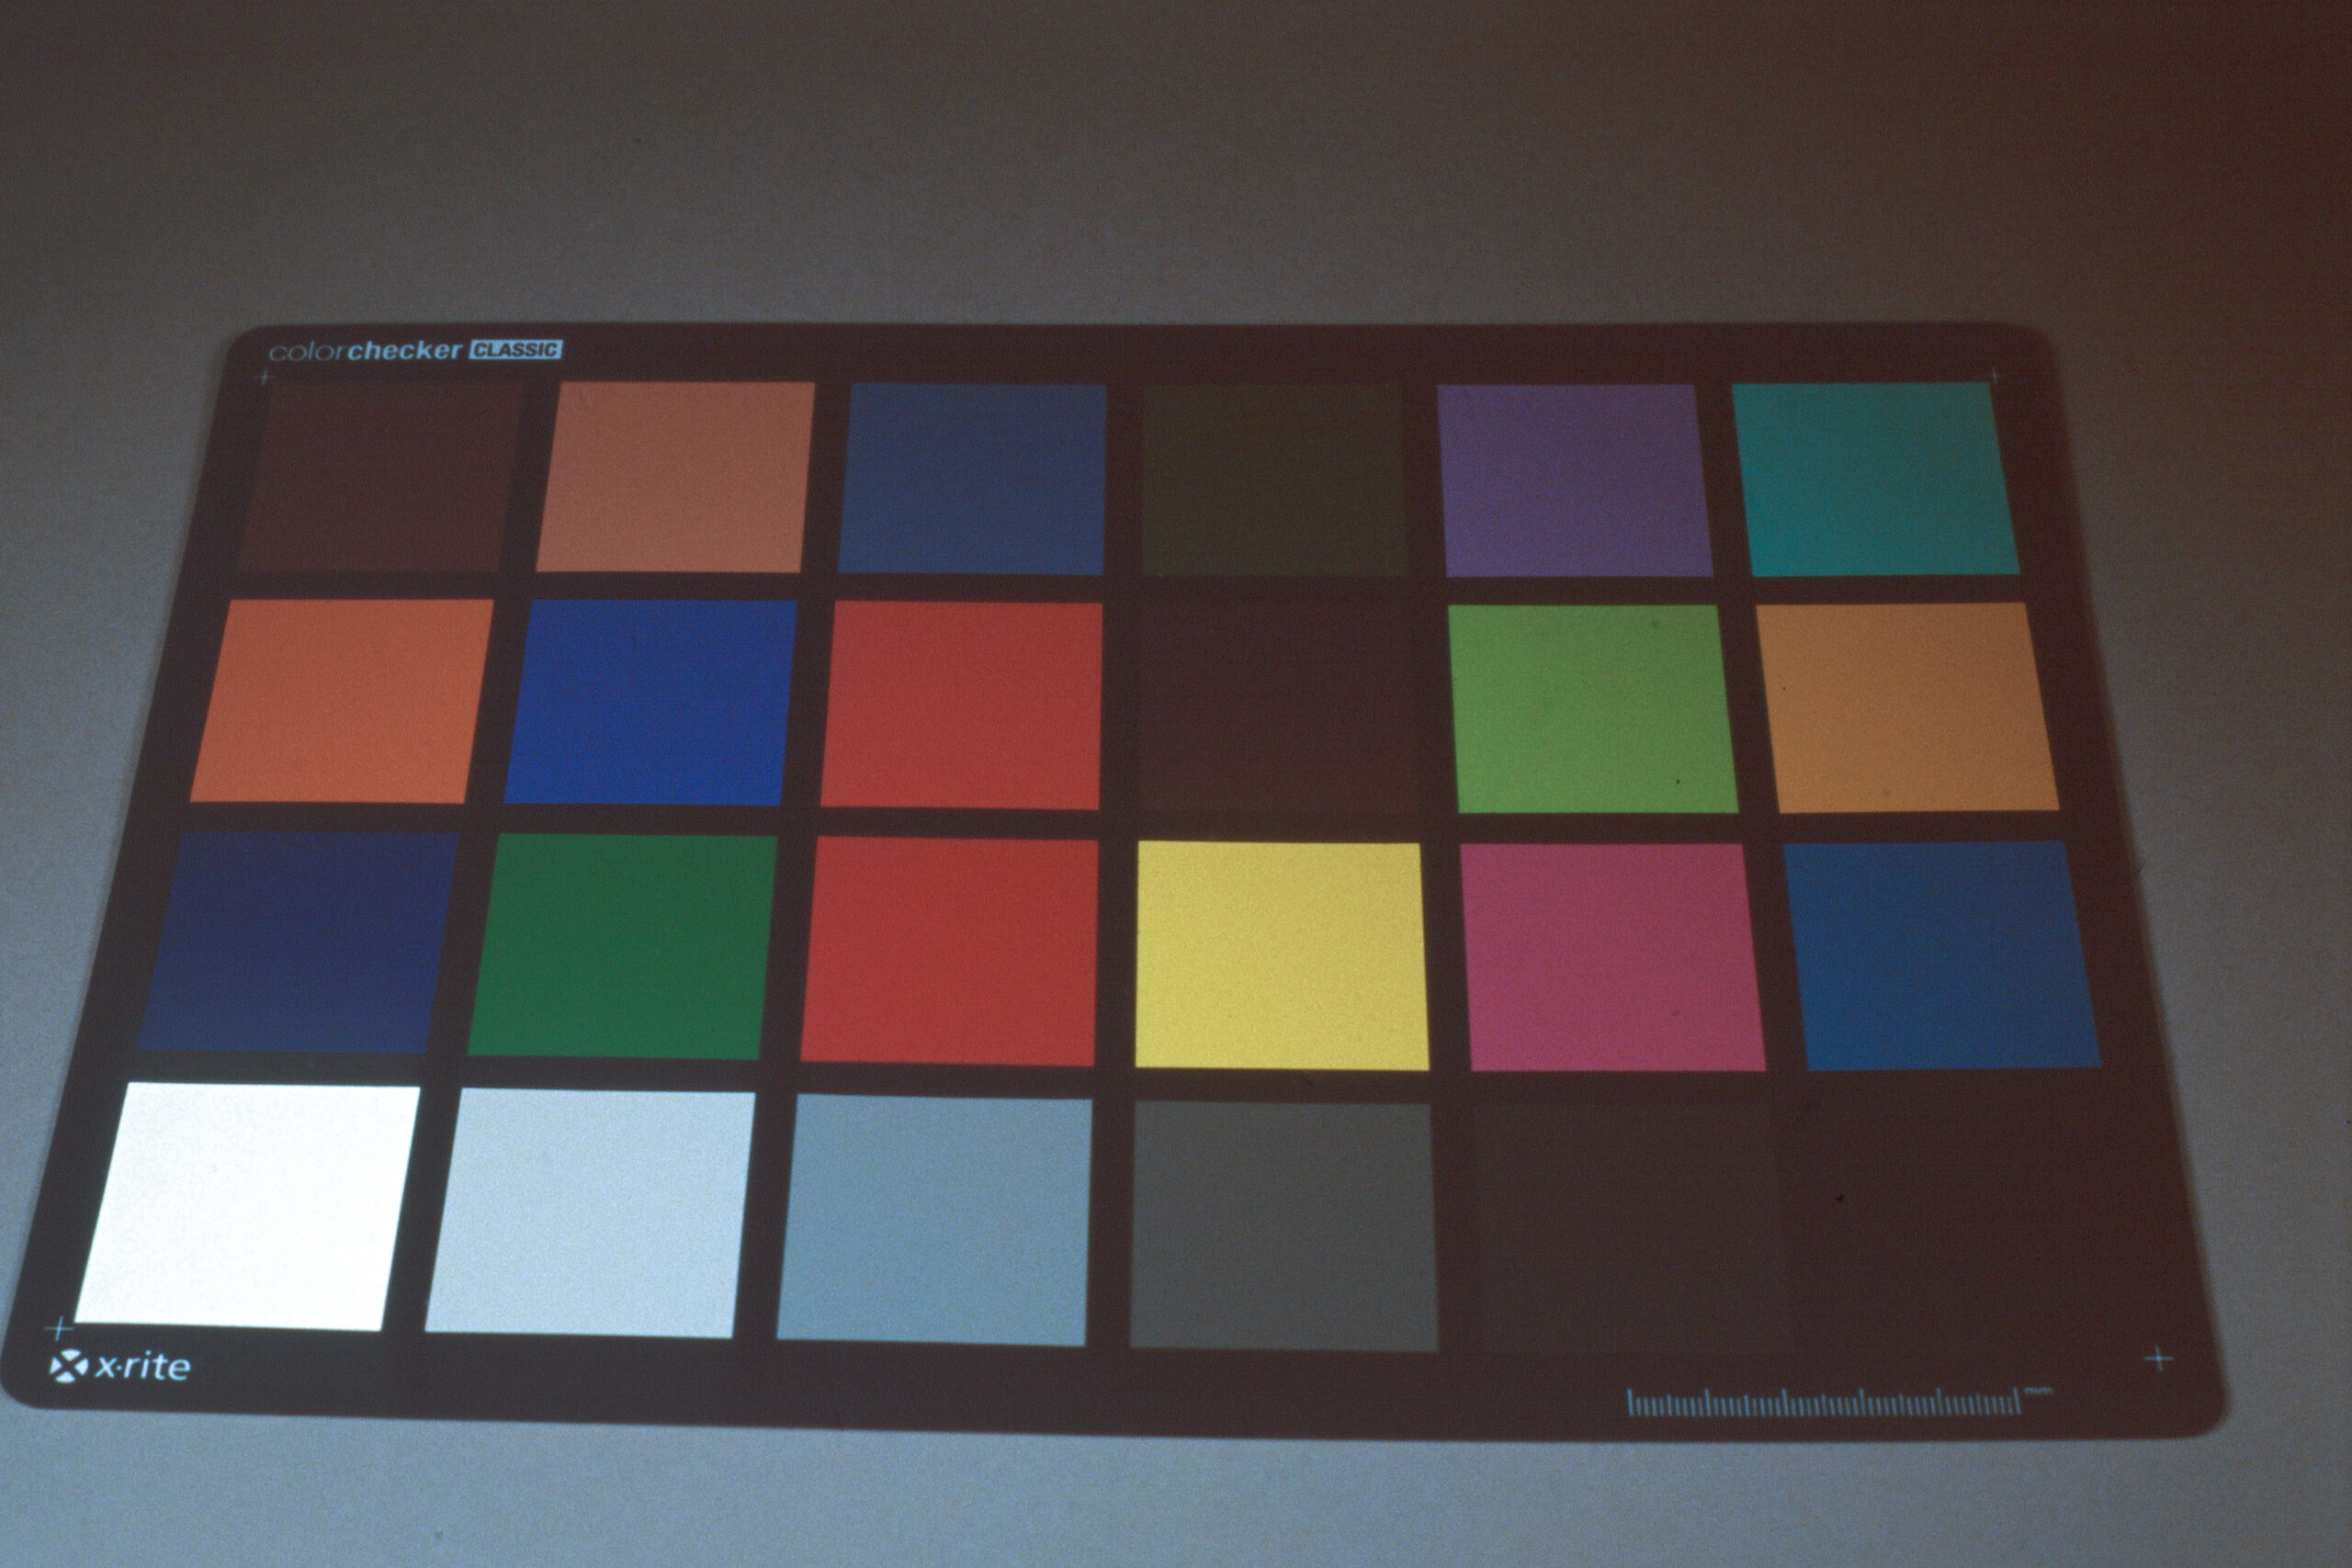
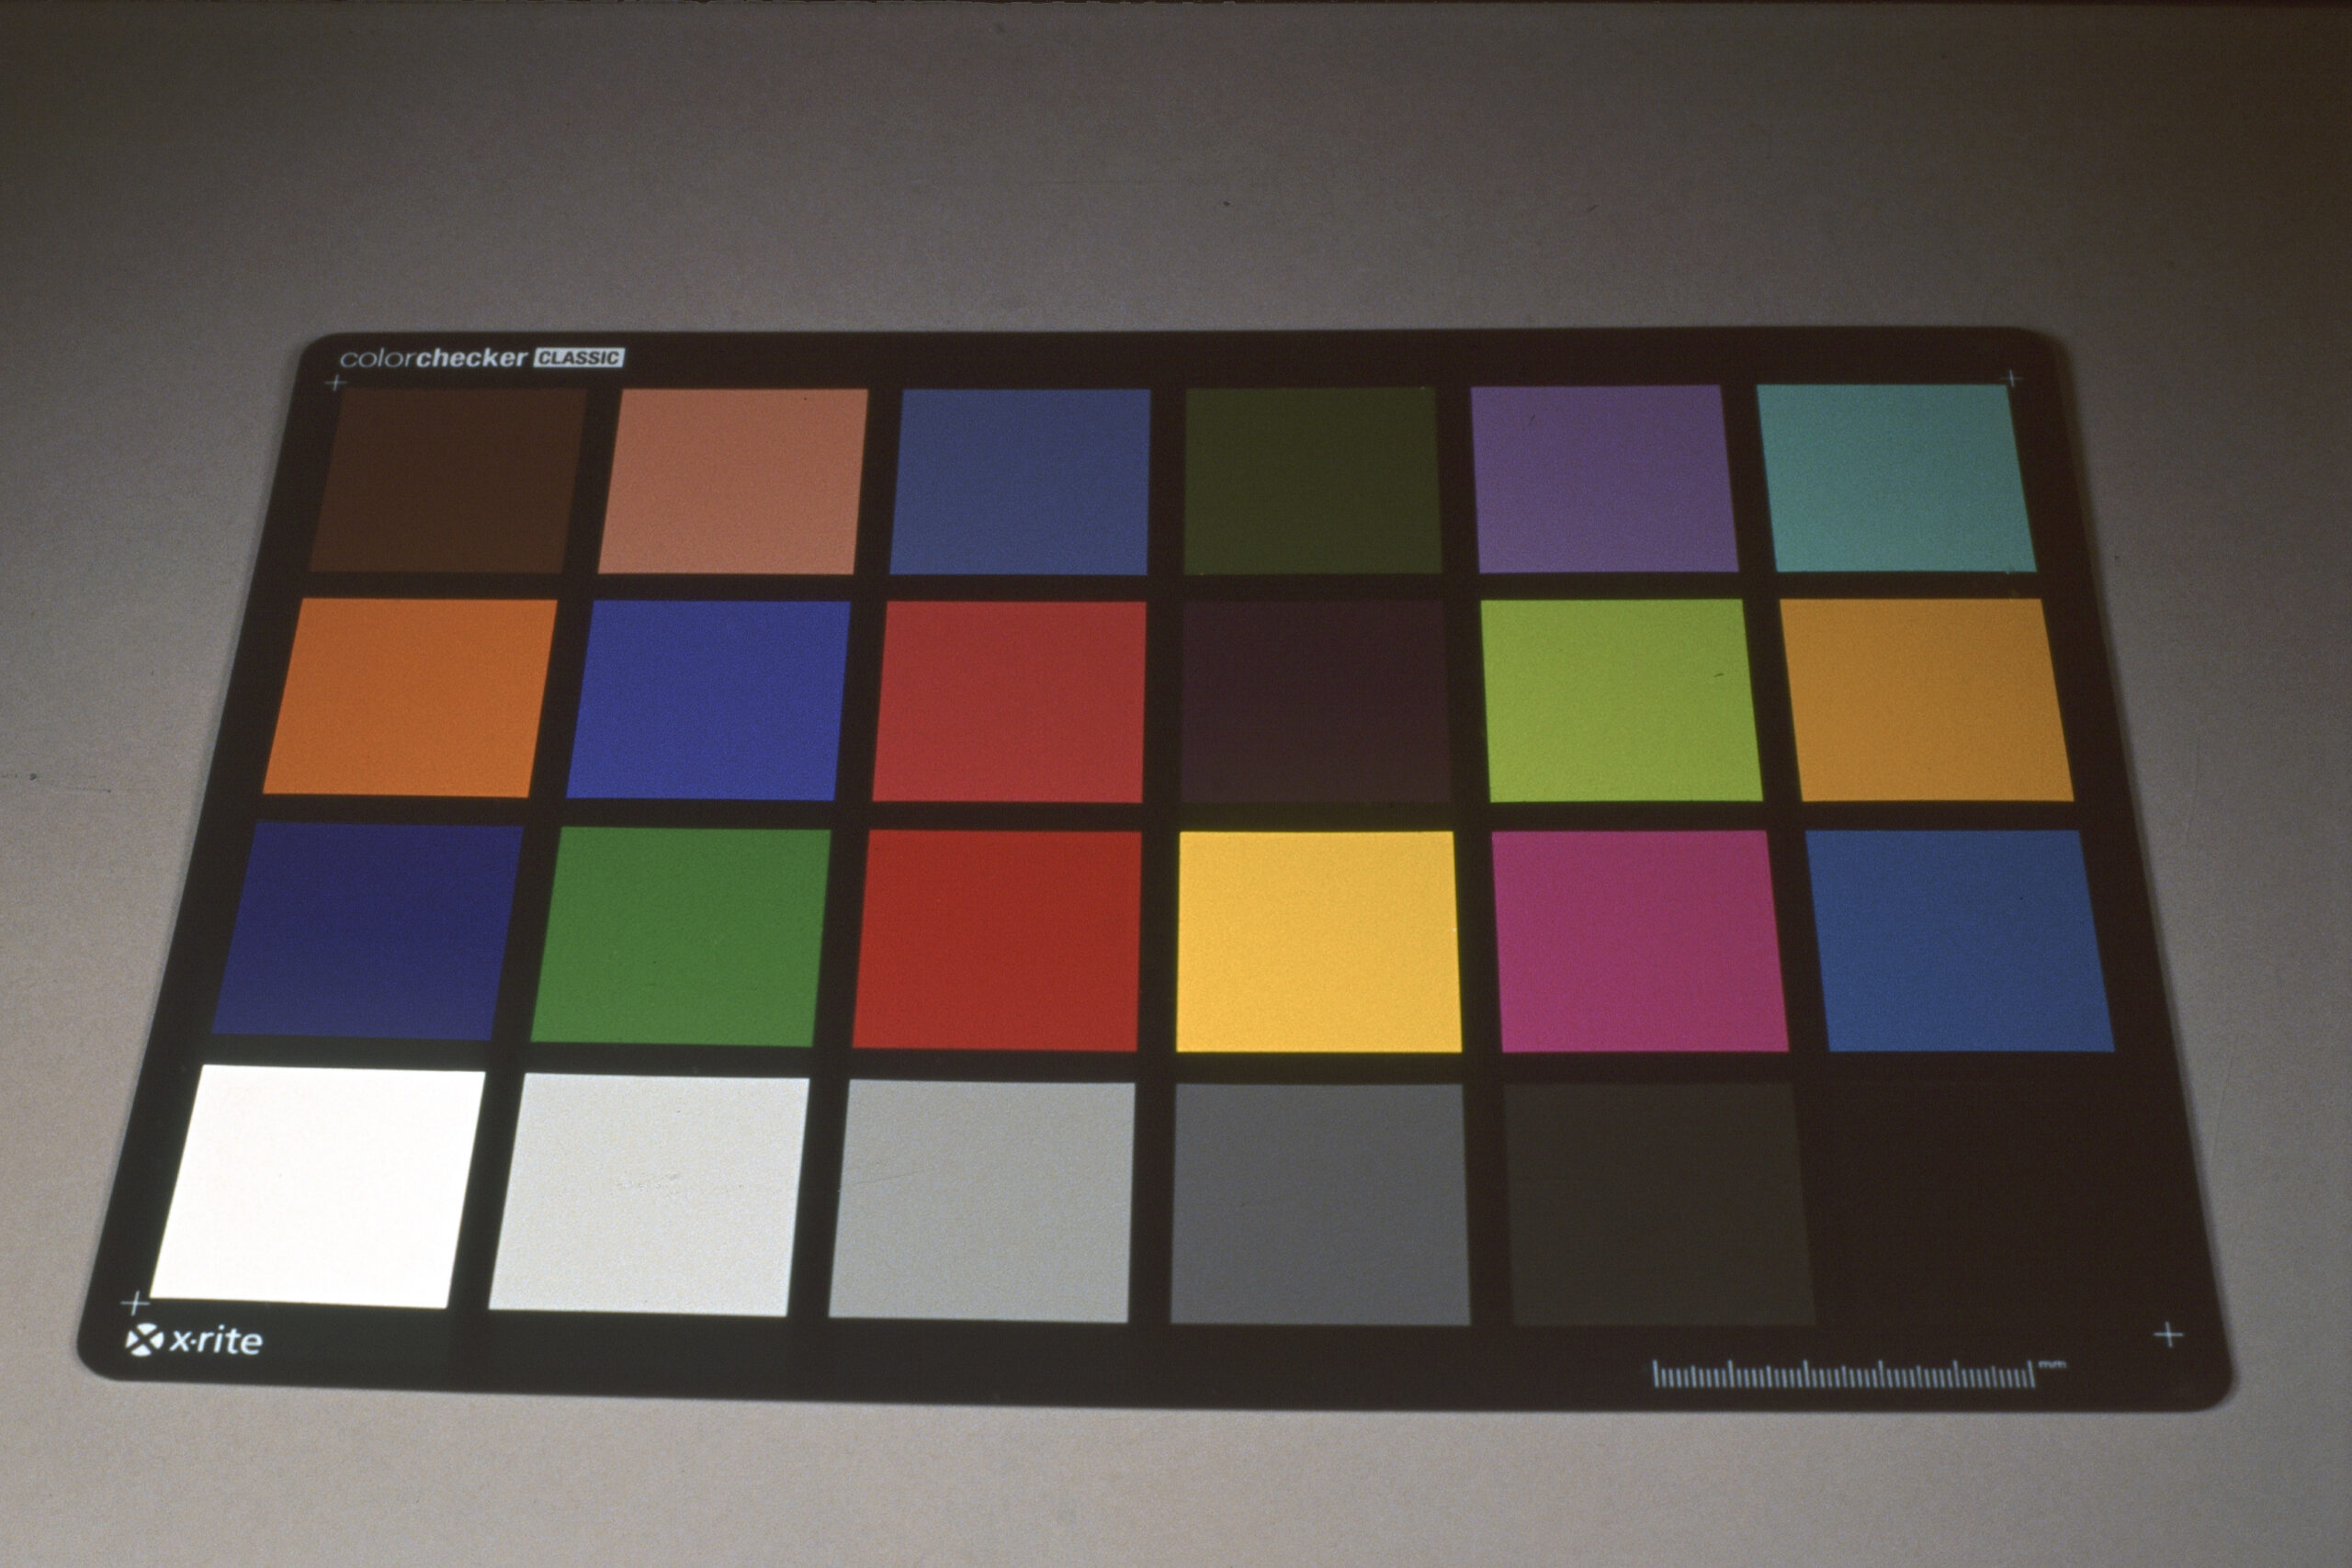
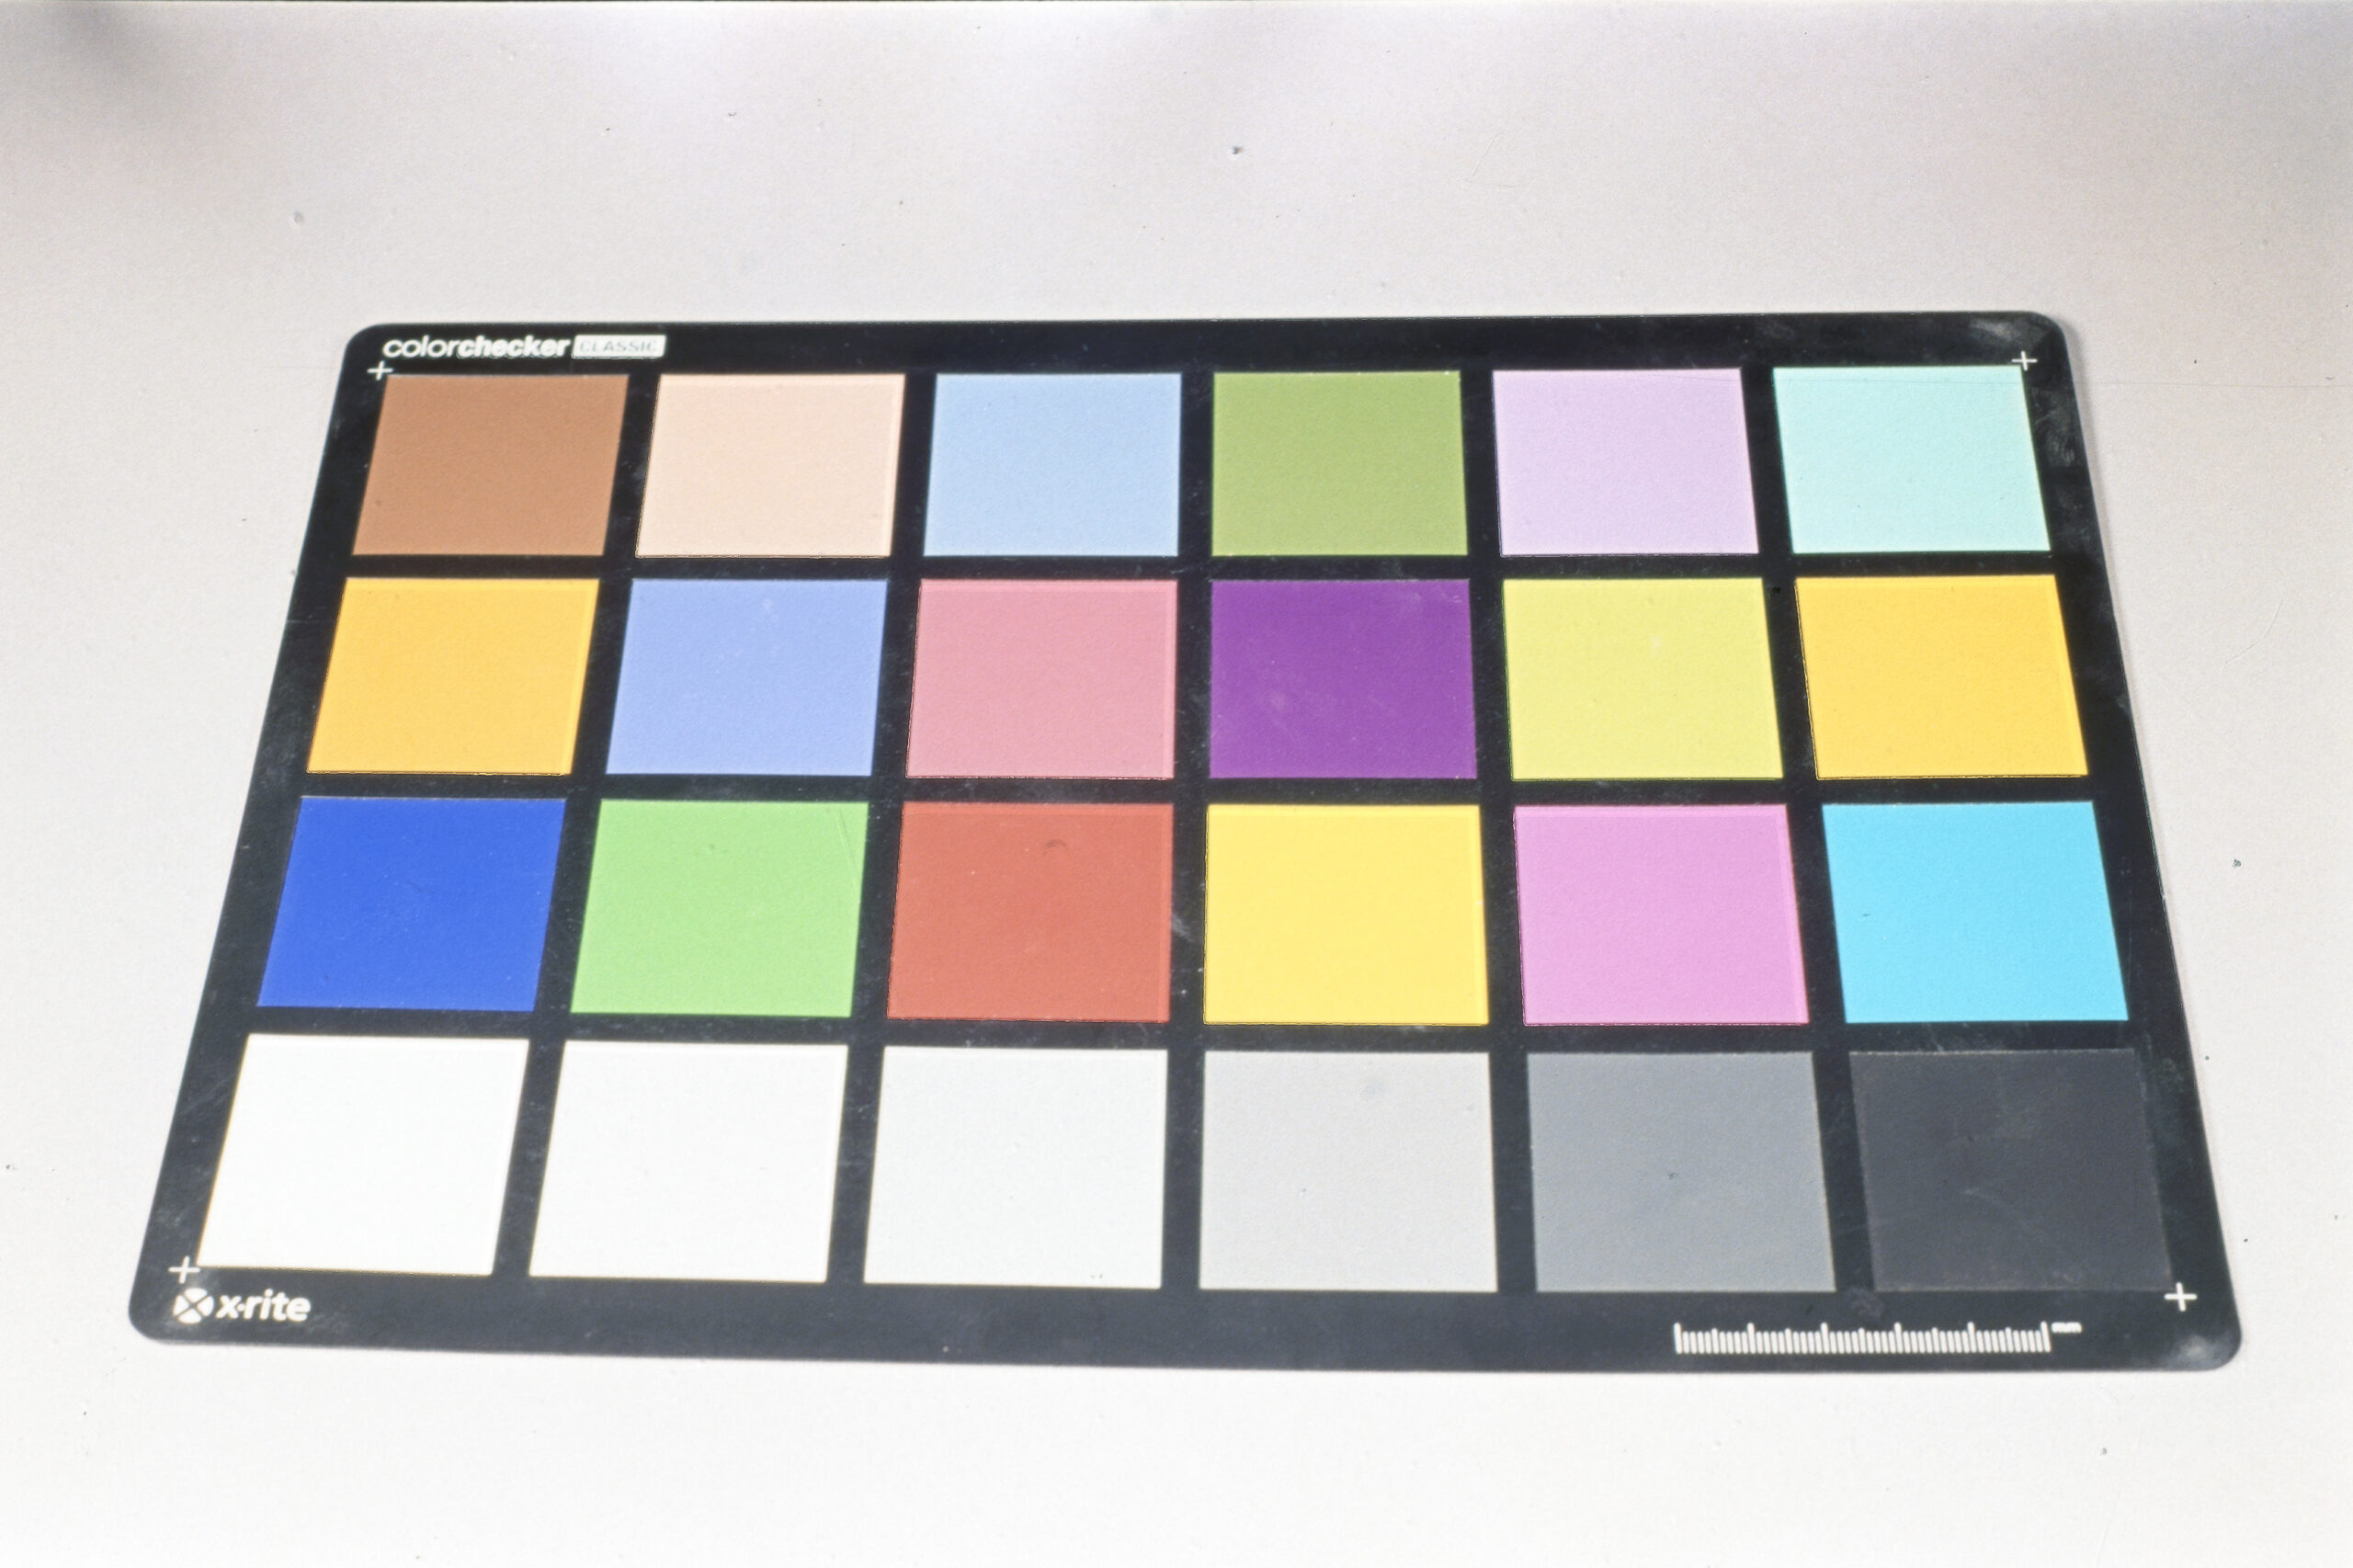
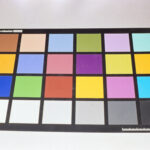
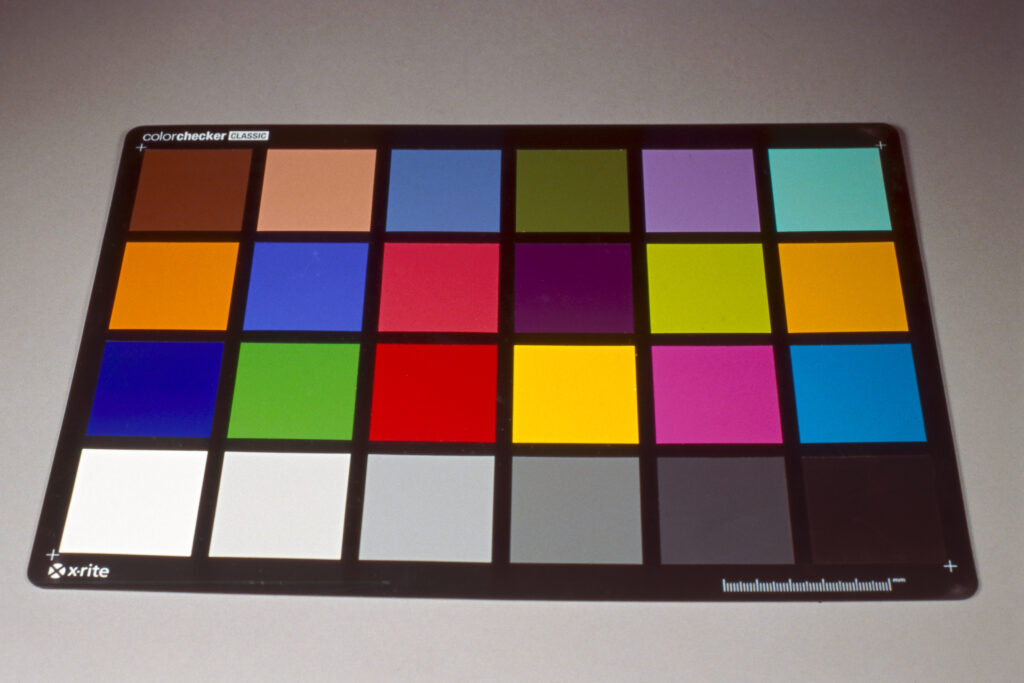
As before I checked the camera meter, and did an incident and reflective meter reading on my Sekonic and all were in agreement. Then I shot a total of 8 shots between -3 and +4 using my X-Rite Color Checker card as a boring but accurate subject. I then scanned them using both Epson Scan and Silverfast using my V800.
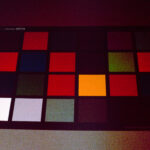
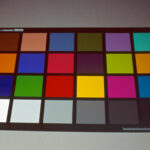
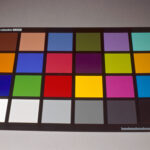
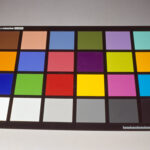
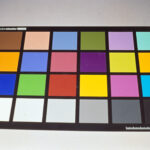
Here’s the raw results:
Epson:
From -3 to +4 using Epson Scan
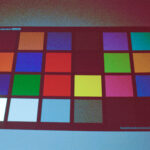
Silverfast:
From -3 to +4 using SIlverfast
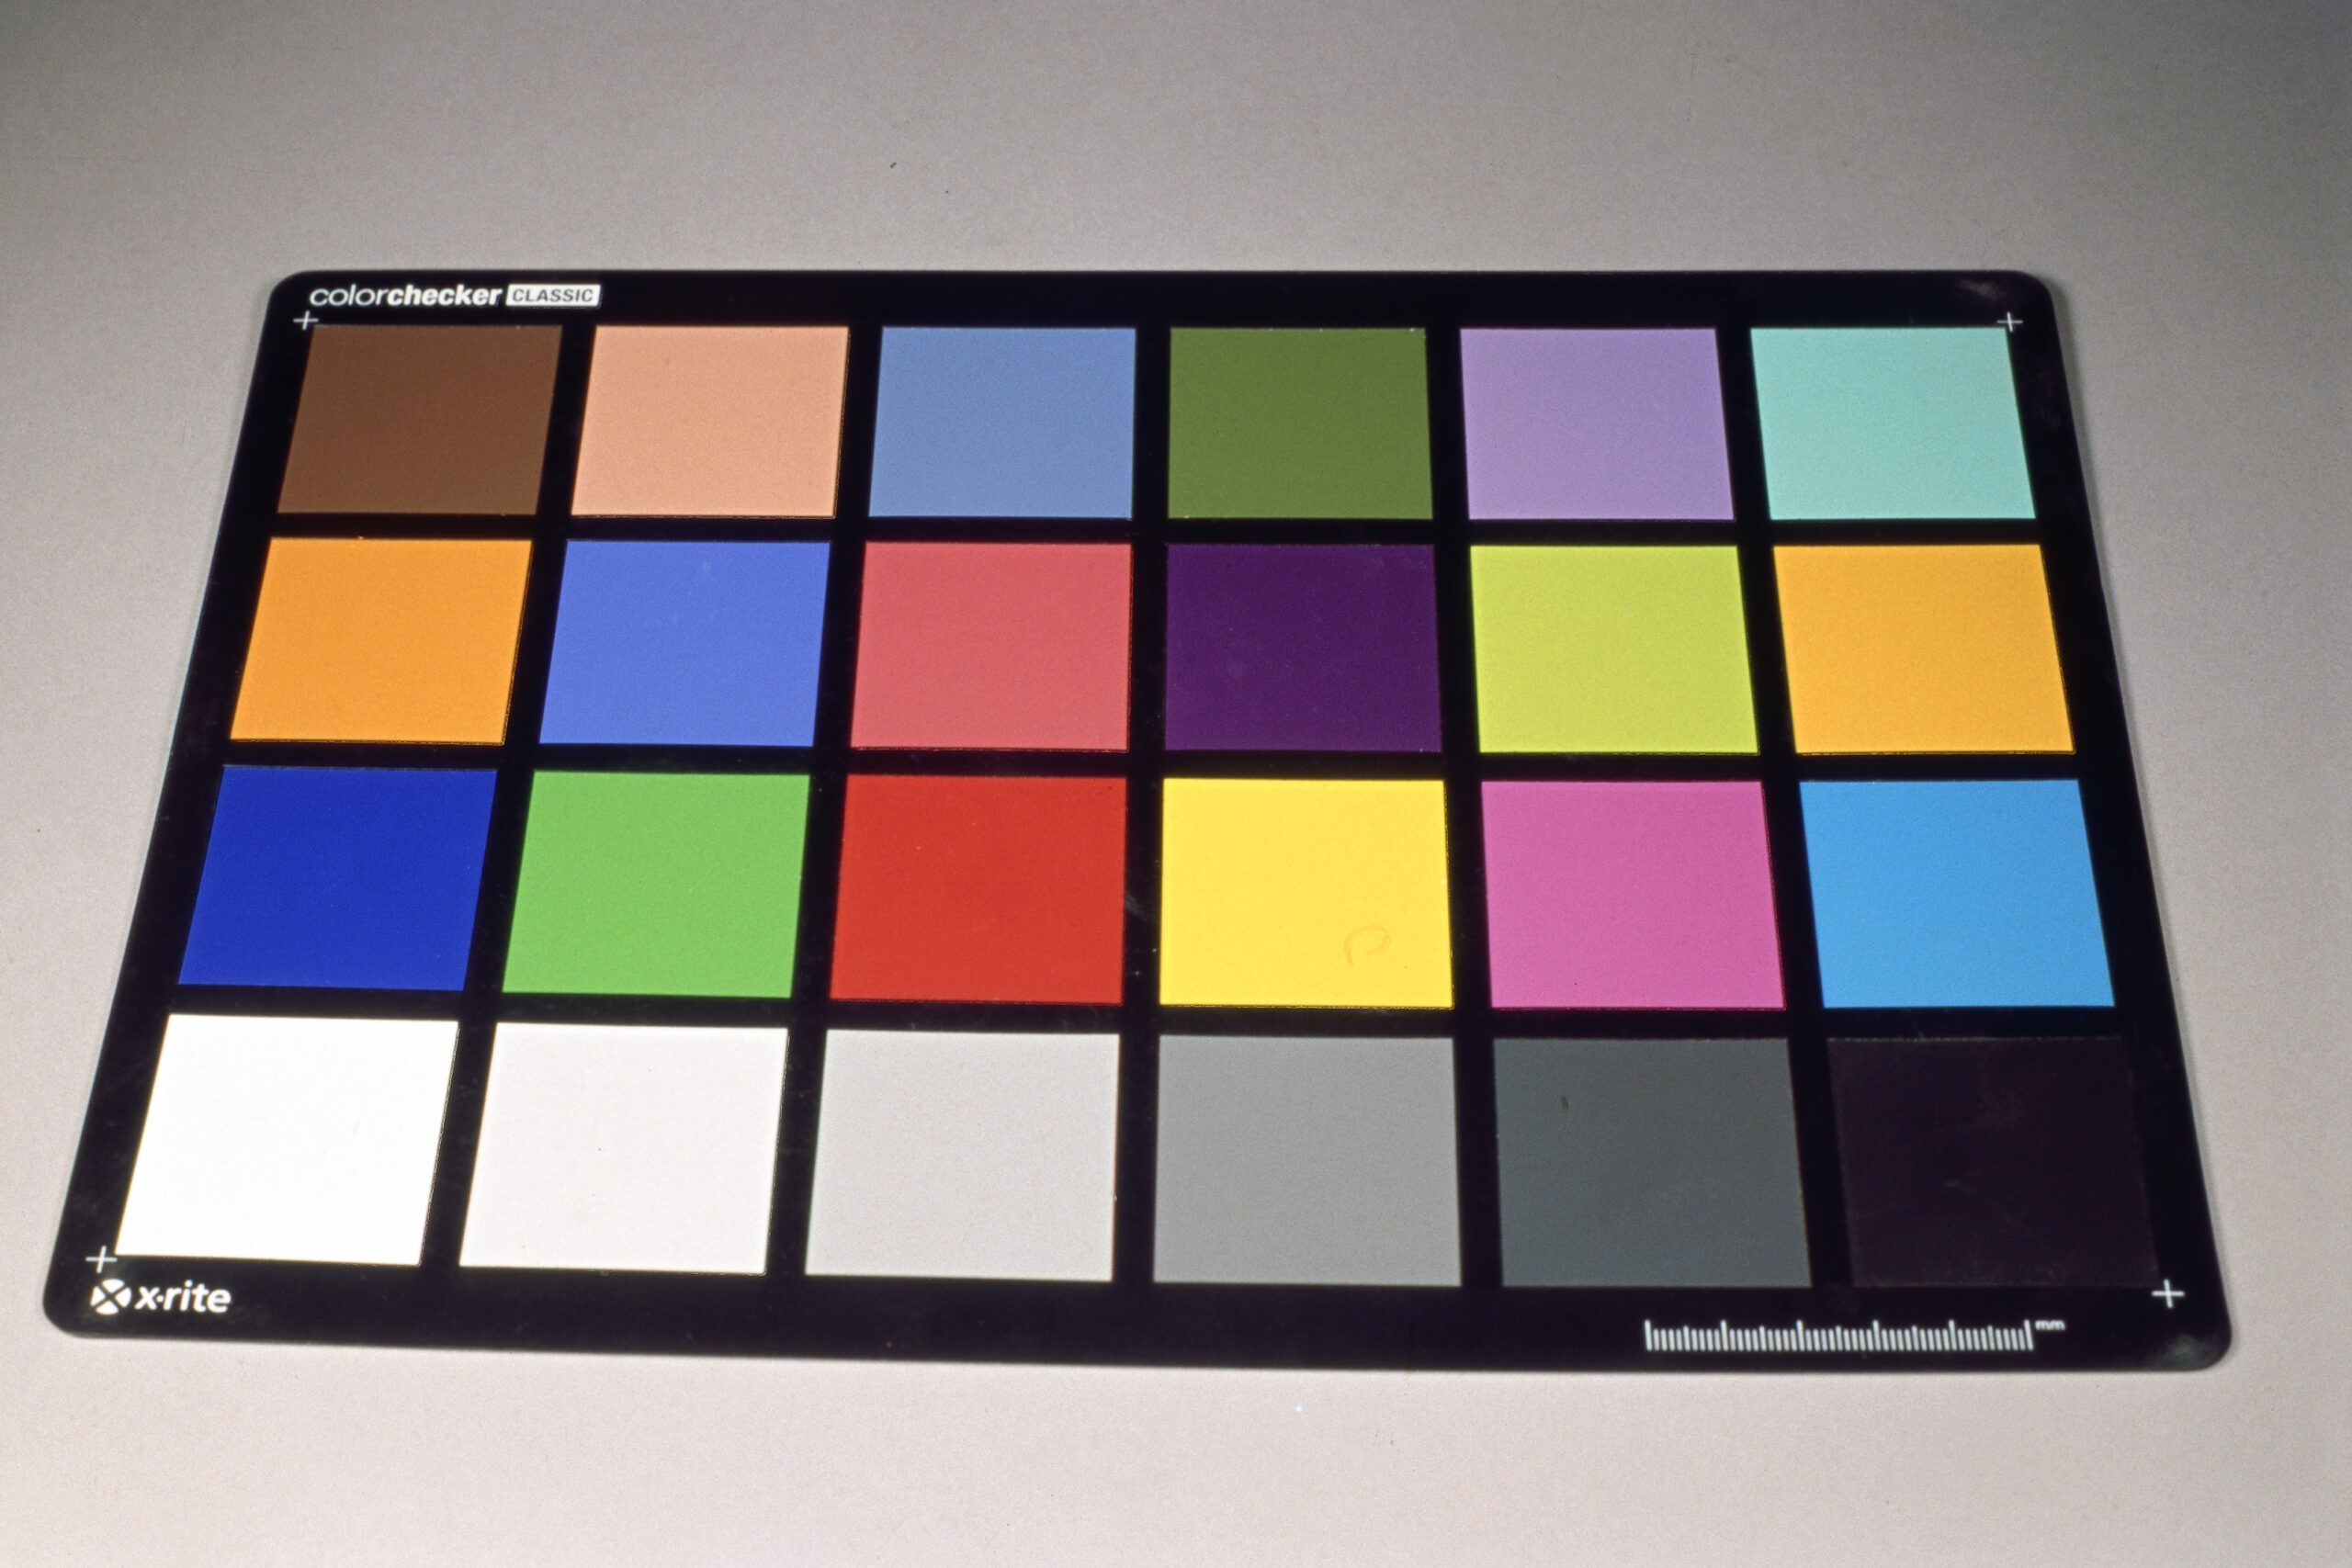
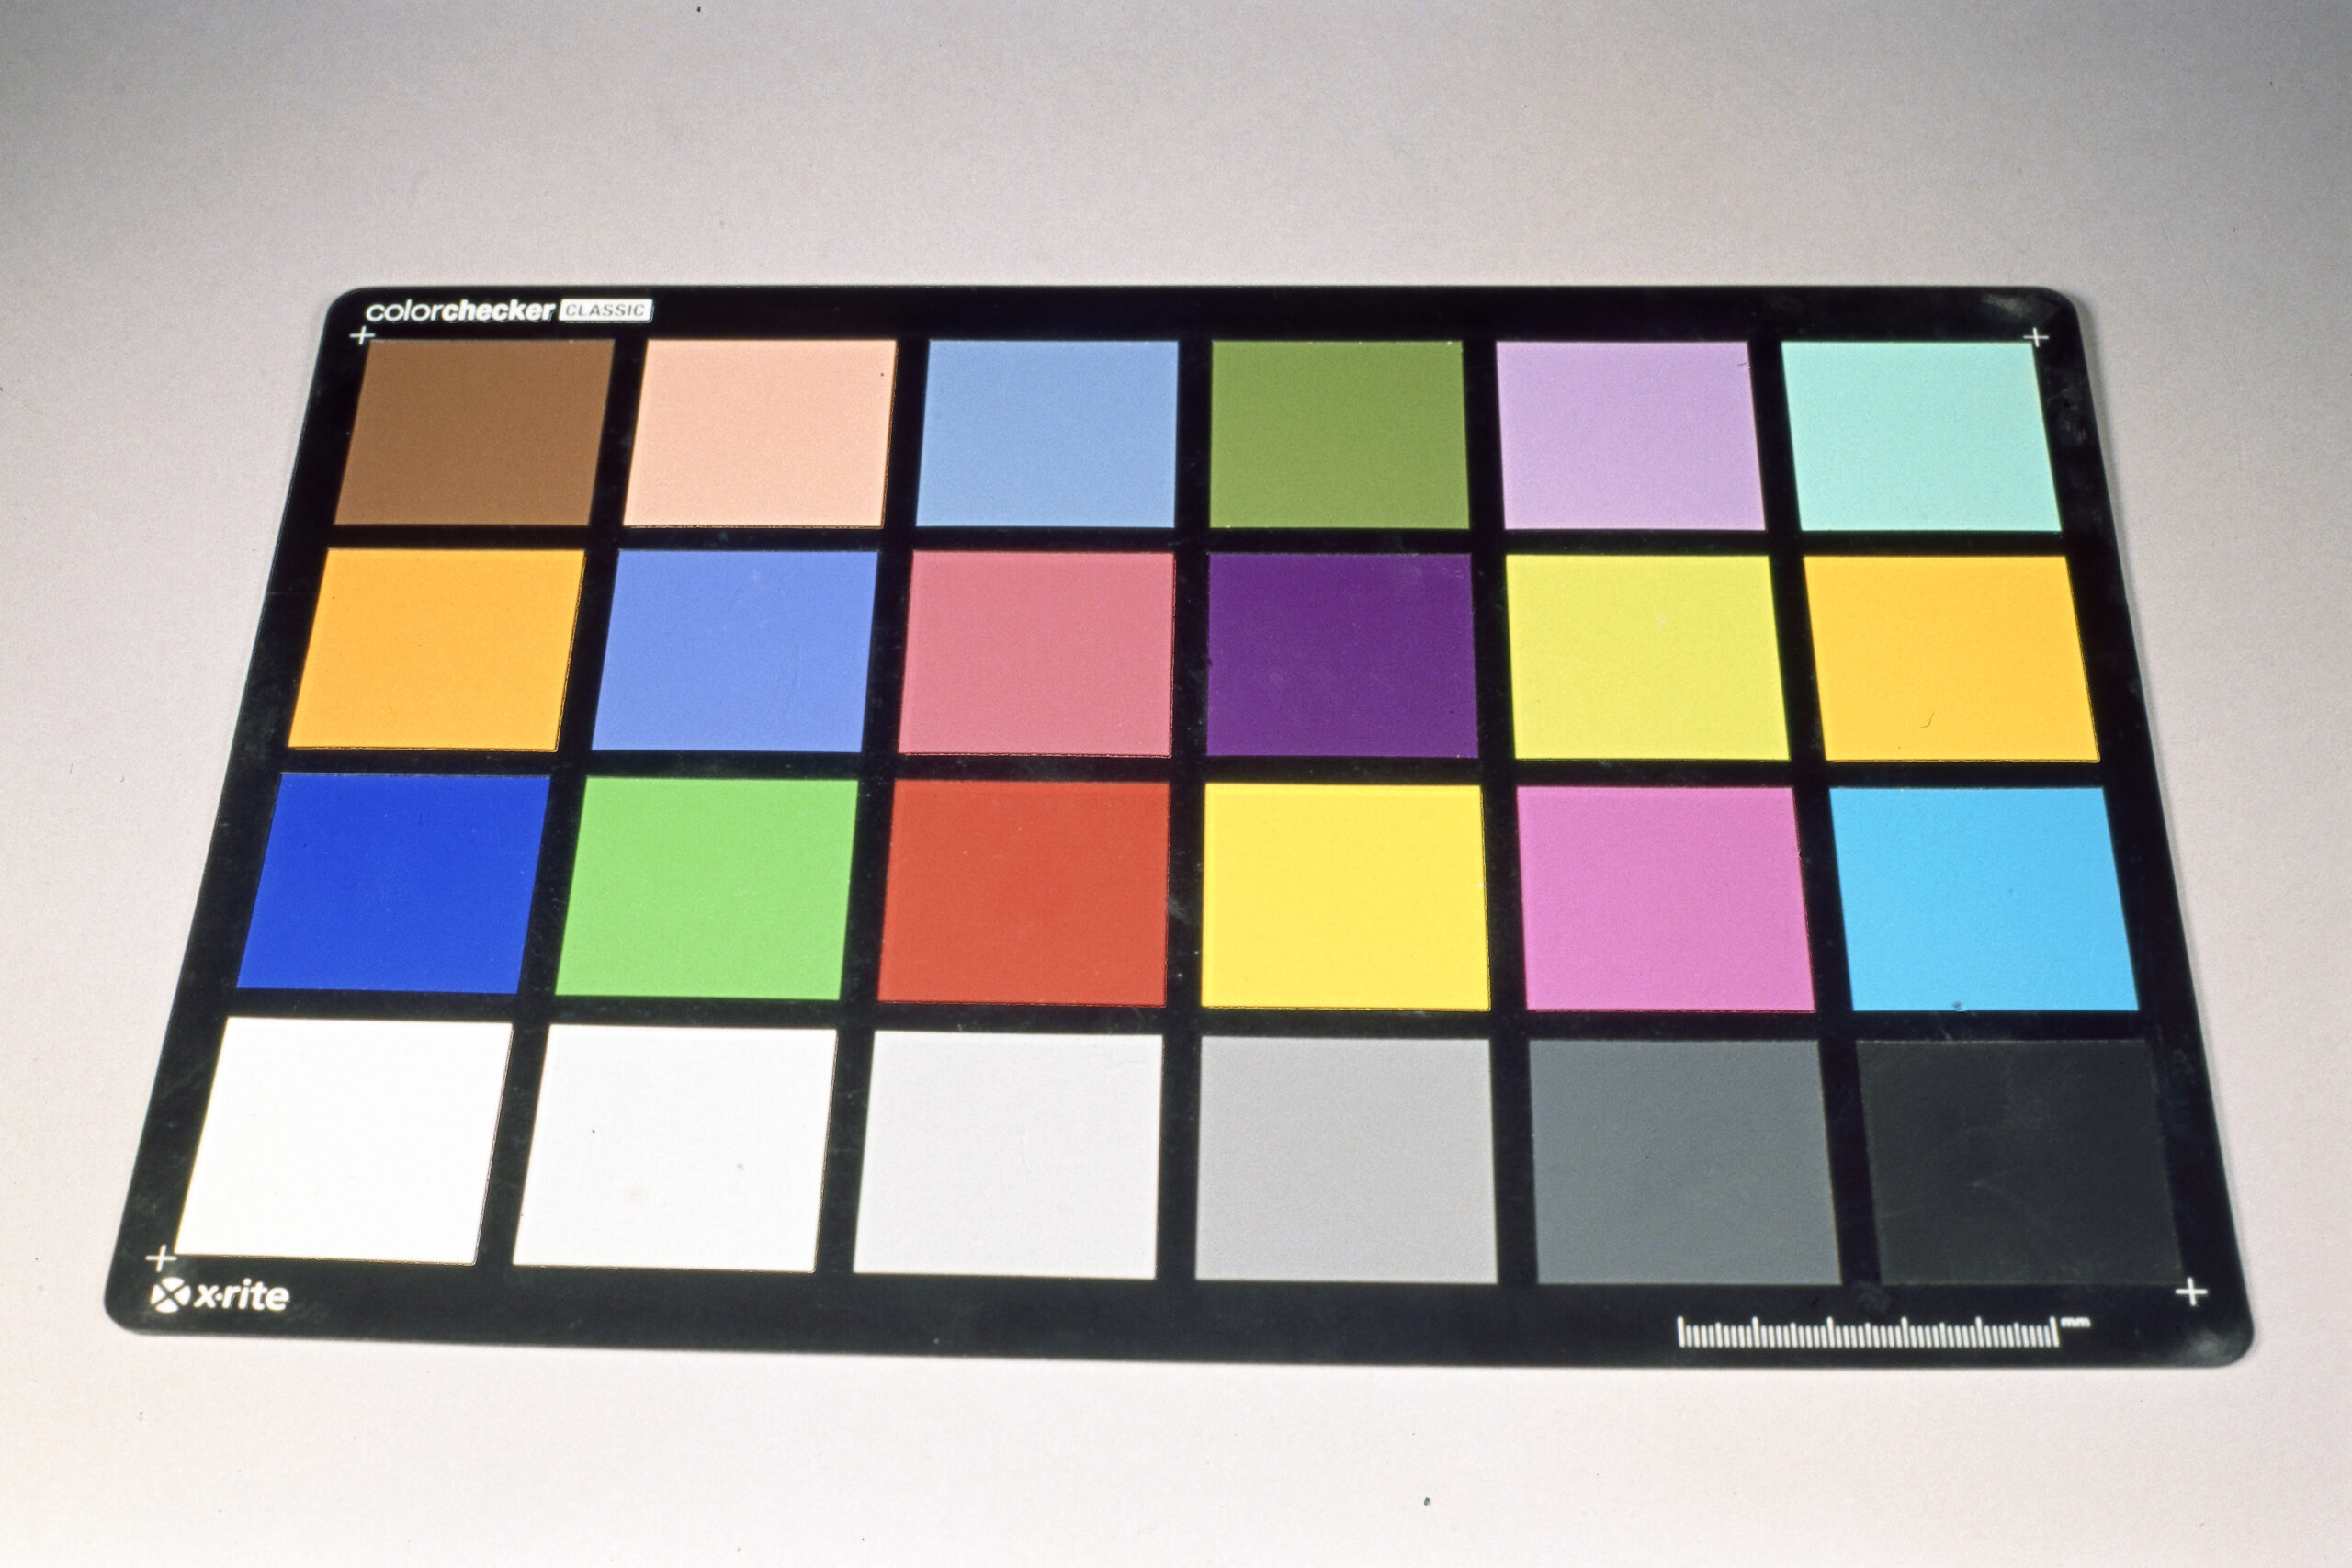
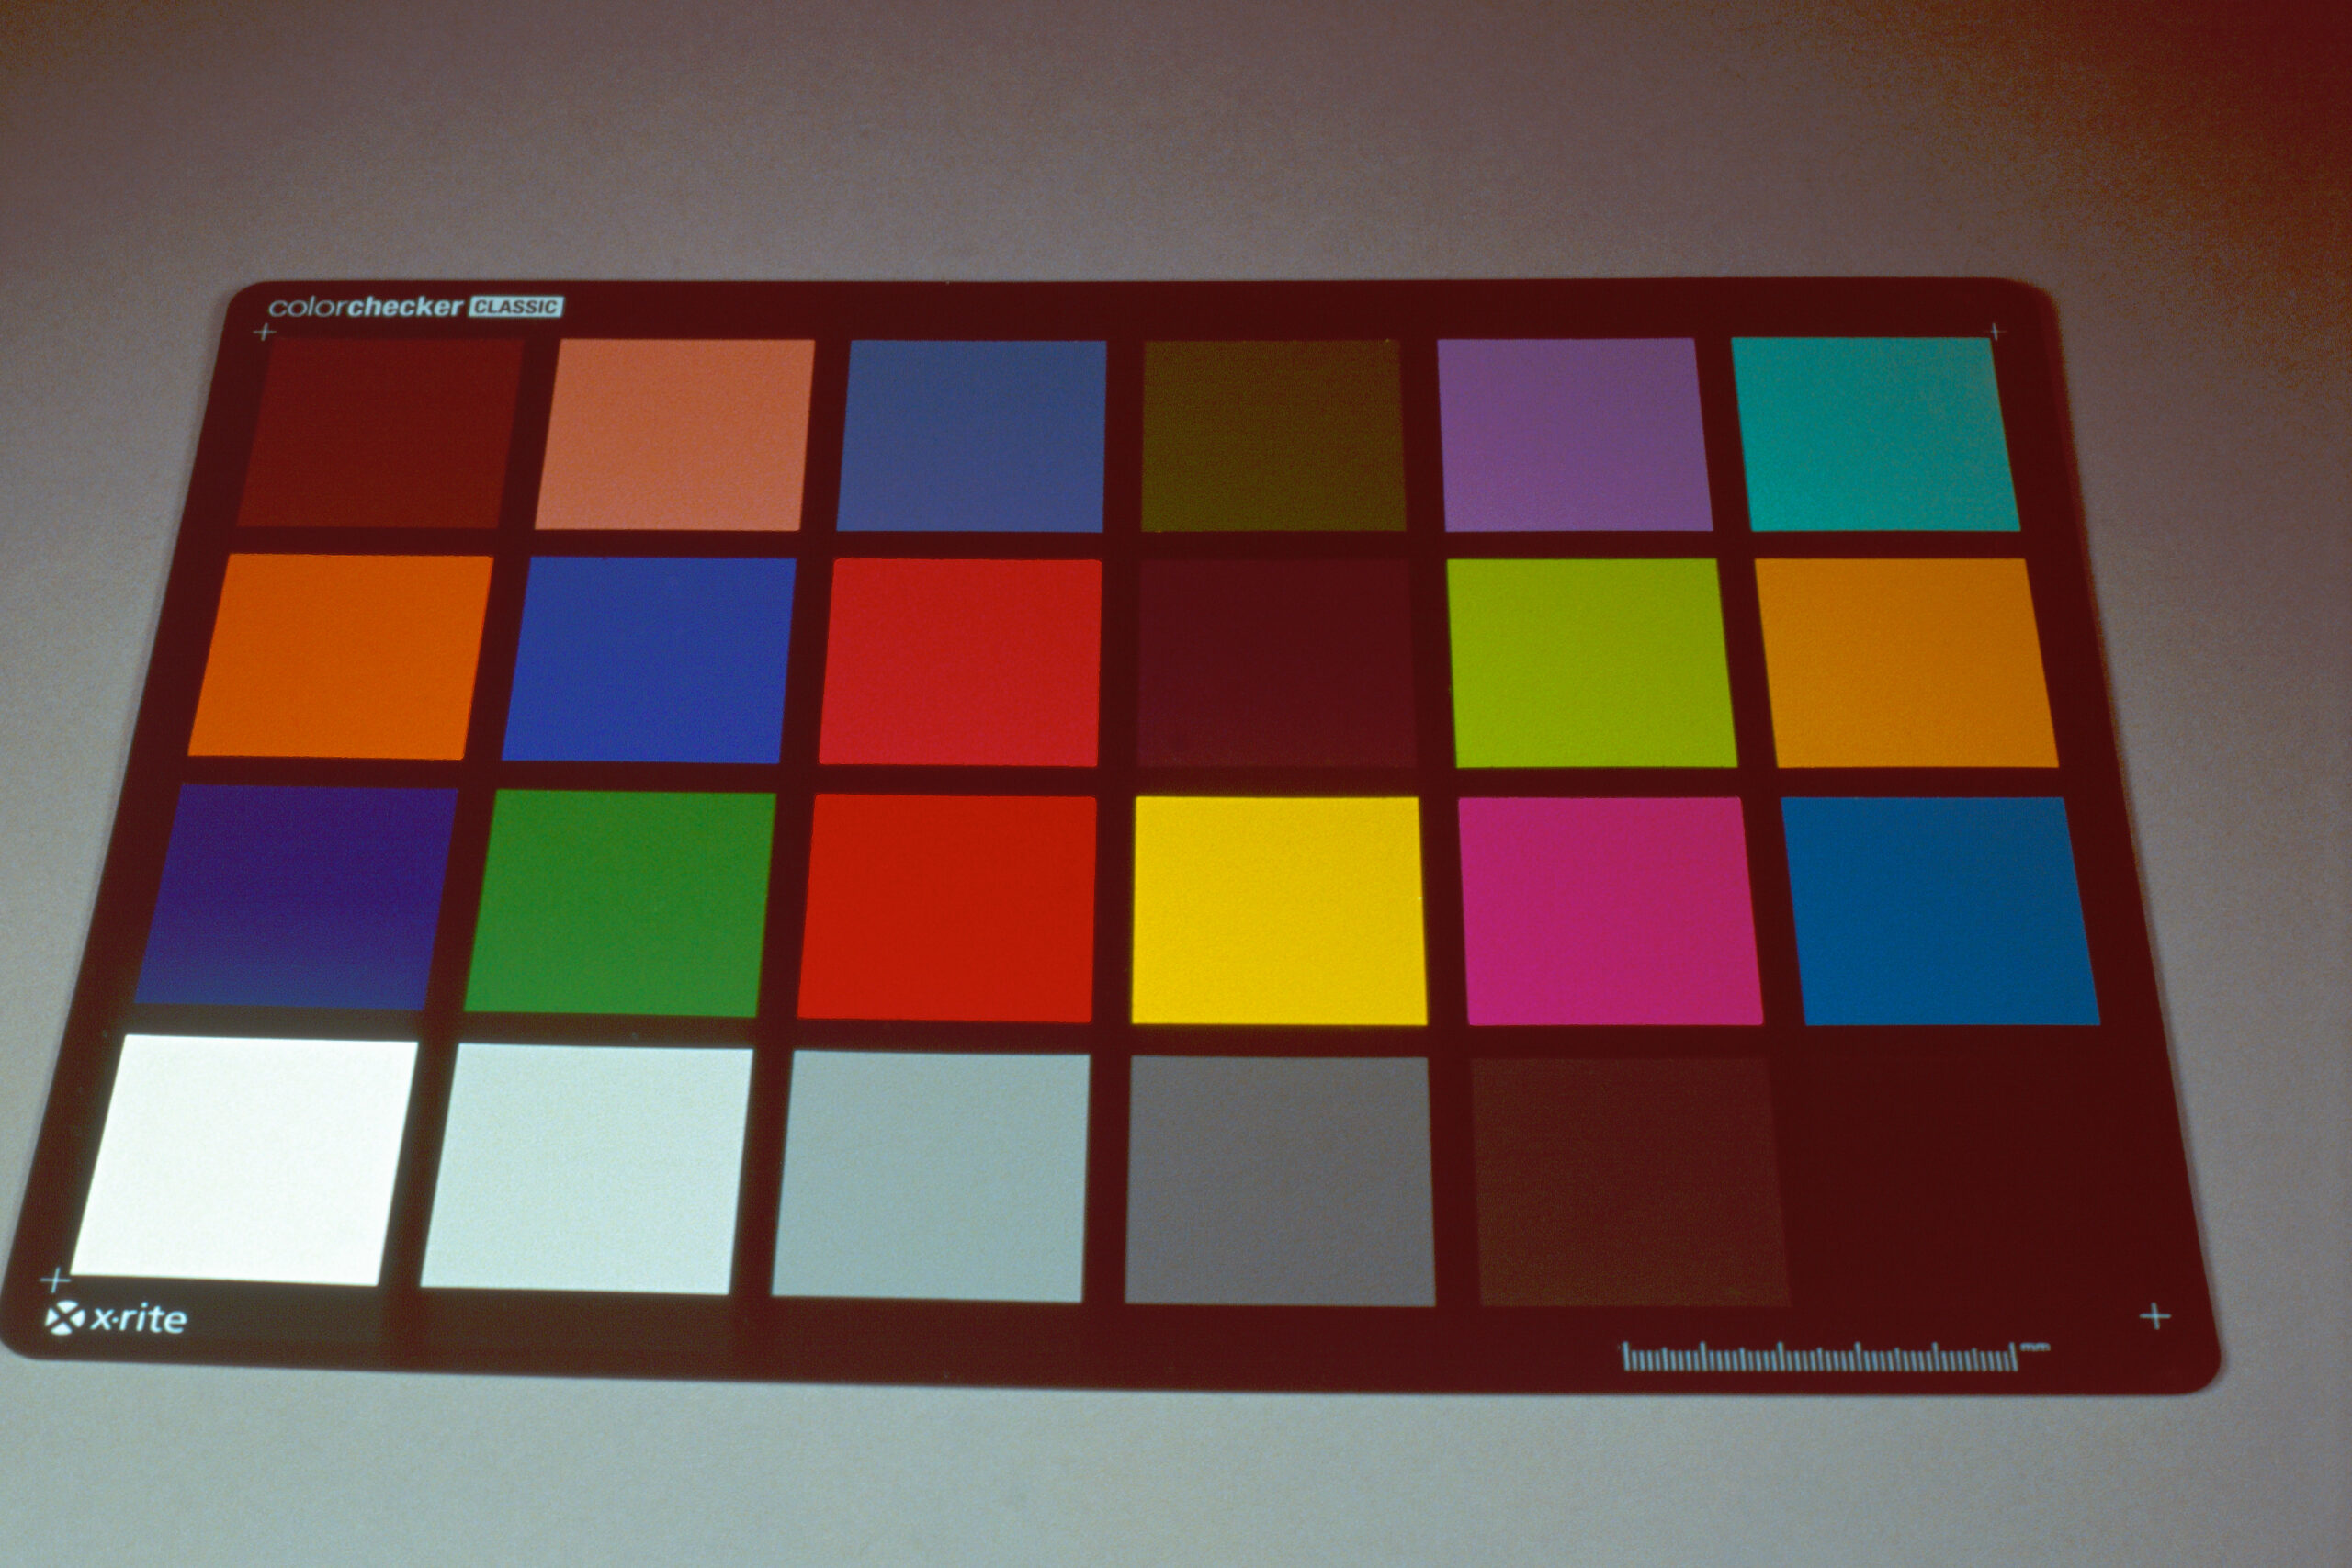
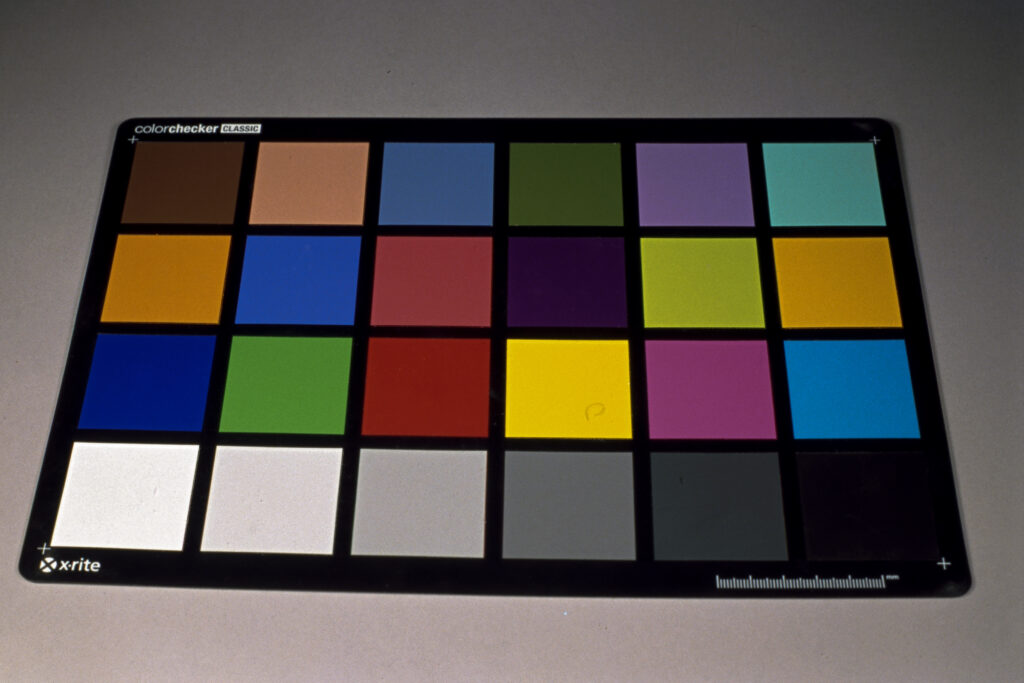
The conclusions I reached are that, yes, the metered exposure seems to be the correct one based on the gray scales on the color chart. But I think I actually like +1 or even +2 better. This does crush the highlights more though still shows recoverable tone when looking at the gray patches and seems to be easier for my Epson to scan. It also lifts the shadows more and seems to give me a bit more room to work. The +1 also seems to remove the color cast that my scanner seems to be good at picking up. For the metered exposure, I can white-balance the cast out but the raw scan seems more accurate.
I should say the above tests were mostly untouched. I cropped the photos a bit and also set the white balance of each exposure using either middle gray or next brighter swatch. That was it.
Surprisingly I find Epson Scan did a better job with the slides than Silverfast. For Silverfast I used Multiple Exposure. Perhaps that wasn’t the best choice and in fact I’ve had mostly miss results with using that settings. Even so, epson scan is usually quicker anyway although I really like and prefer Silverfast when scanning C-41.
Epson +1 AdjustedSilverfast +1 AdjustedEpson +2 AdjustedSIlverfast +2 AdjustedSide by side showing adjusted results for both Epson and Silverfast scans. I adjusted for how I might set things in Lightroom for actual product photos.
What this tells me is scanning slides, at least 35mm ones, on my Epson is maybe not the best option. Part of this product photography experiment included downsizing my digital camera setup. I’m not sure if my D80 can really do the slides justice but that will be the next thing to try (and as an aside I really do like the CCD look of my D80 vs the D750 when I had it). I generally prefer the flatbed scanning workflow though.
This test also really only gives me information for the Bellini kit and my processing with it. The next step is to do an exposure test to send over to a lab I think and compare that way. Certainly a lab adds cost but these aren’t extravagant relative to the film cost itself.
So there ya go! I should make clear, these results are what I landed on for my process and methods. They may be different for you! I am very curious about how this compares to lab developed film so I suspect that will probably be part 3 of this little mini-series. Until then, if you want to grab up your own 100 ft roll of BitChrome 100, you can do so here.
First and foremost, let me introduce you to BitChrome 100!
A 100ft can of BitChrome 100
BitChrome 100 is Kodak 5294 (E100D) that has been hand-spooled from a fresh 400ft roll down to 100ft rolls suitable for loading into typical still film bulk loaders (such as the Lloyd, Watson, Bobinquick, etc.). I’m not yet sure if I’ll continue to re-roll 5294. It depends on interest and how folks that participated in the first batch like it.
400ft can of Kodak 5294 (E100D)
The reason I went down this road was actually as a bit of an experiment. I sell analog photography accessories and it occurred to me it would be interesting to take my product photos ON film. A lot of folks who wax poetic about film (myself included) talk about how it slows you down. I haven’t enjoyed product photography all that much and I think it has showed in my results. The idea of using film though, indeed, slows me down and makes me more deliberate and thoughtful on taking good photos.
In fact I’ve already done this. Surprise surprise the above shot was taken ON BitChrome 100! And admittedly it shows a bit. Not because of BitChrome but because I under-developed the film. This was my first time developing E-6 film using the Bellini kit and I miss-timed the first development step. Doh! I need to work on that.
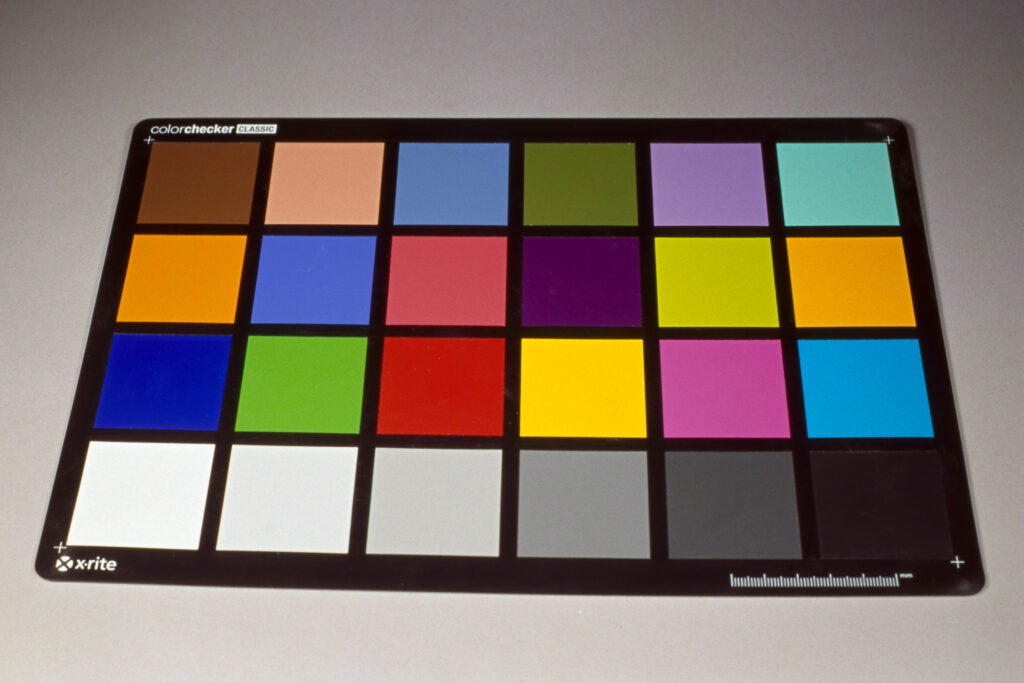
Testing exposure and development using a color chart. Film ended up fairly dense due to under-development.
But why 5294? The big issue was, when taking product photos on 35mm, running through 36 exposures isn’t always ideal. If I’m only adding 1 or 2 new products that only require a few photos each, now I have the rest of the roll I need to figure out what to do with. By using the movie stock, I can short roll down to whatever frames I might actually need and just develop that. There is some space used on the ends but when you consider the raw cost of a 400ft roll of Kodak 5294, it ends up being quite economical.
If Kodak Alaris were to offer 100ft spools, I would have just done that. For whatever reason they don’t (but they should) so instead I simply ordered from Kodak Rochester directly. That results in a substantial discount and is why I was looking at bringing out BitChrome 100 so other folks have a more affordable bulk roll option for E100D. Note that I’m only planning on offering 100ft spools and not small 36exp canisters. That said, bulk rolling your own film is both cost effective and fun!
If you’re interested in buying some BitChrome 100, have a look at our store or contact us directly!